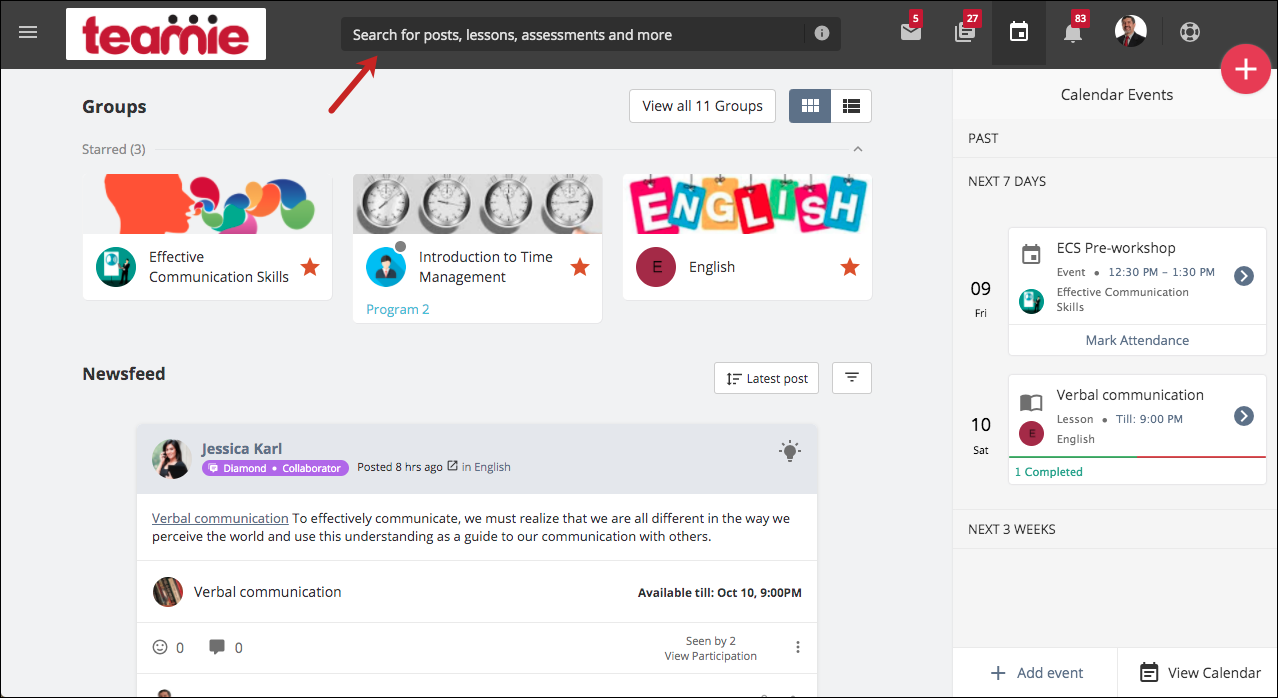
Hello everyone! We welcome you to our latest update – Teamie Jabbah (2.9)! This update brings a lot of new additions to the platform, including the ability to enclose assessments within a lesson, revamped attendance feature, and grouping modules under a program. Before we discuss all this and much more, let us first give you a TL;DR version of the features and enhancements that were rolled out since our last update:
- Adding assessments in a lesson
- Representing and organising a collection of modules/classrooms as a program
- Revamped attendance feature
- Adding attachments to a classroom’s About page
- Viewing as a learner option for instructors
- SCORM assignment creation now in Dash
- Exporting filtered data from Gradebook
- Configuration to hide learners’ Gradebook performance chart
- Enhanced quiz interface for better user experience
- Improved download for large files
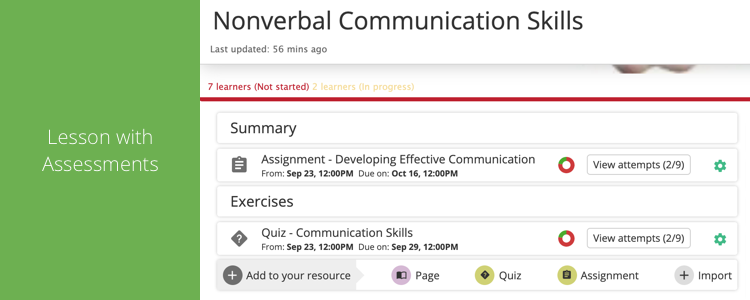
Lesson with Assessments
We have added the much awaited functionality of allowing instructors to include assessments inside a lesson/unit. These assessments (assignments and quizzes) will be added as a lesson page inside a lesson. As an instructor, you can link/attach an assessment (excluding offline test) within a lesson to allow learners to attempt them in a sequence and facilitate learning.
One of the advantages of this feature is to make the process of creating streamlined content more user friendly. Furthermore, this feature will help instructors in making the sequence of learning materials more compact and easier to share.
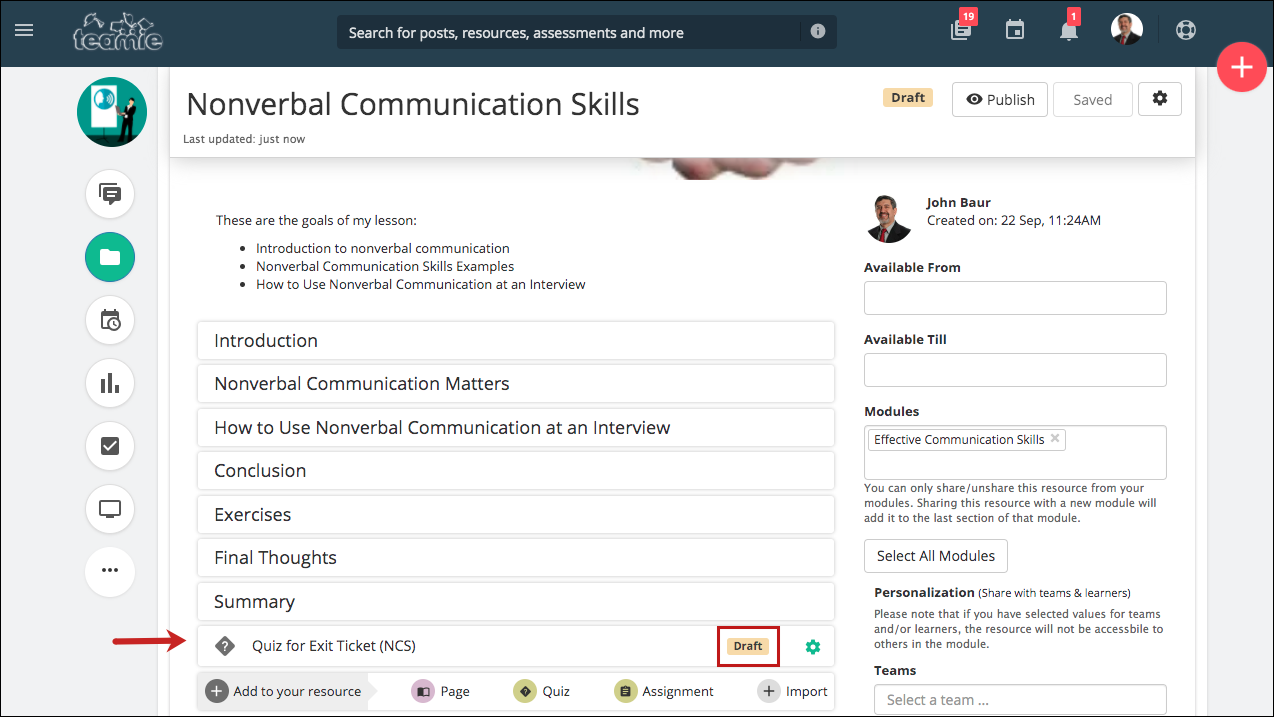
To add an assessment to a lesson, click to expand the required lesson. In addition to the existing option to add lesson pages to the lesson, you will now find the option to add a new assessment (quiz/assignment) to the lesson page or import an existing assessment.

The interface for creating an assessment from the lesson expanded view is similar to creating a lesson page. You need to enter the title of the new assessment and press enter to add it to the lesson.

By default, the assessment will be created in draft mode. Click to open the assessment in full view and then click Edit to edit it.

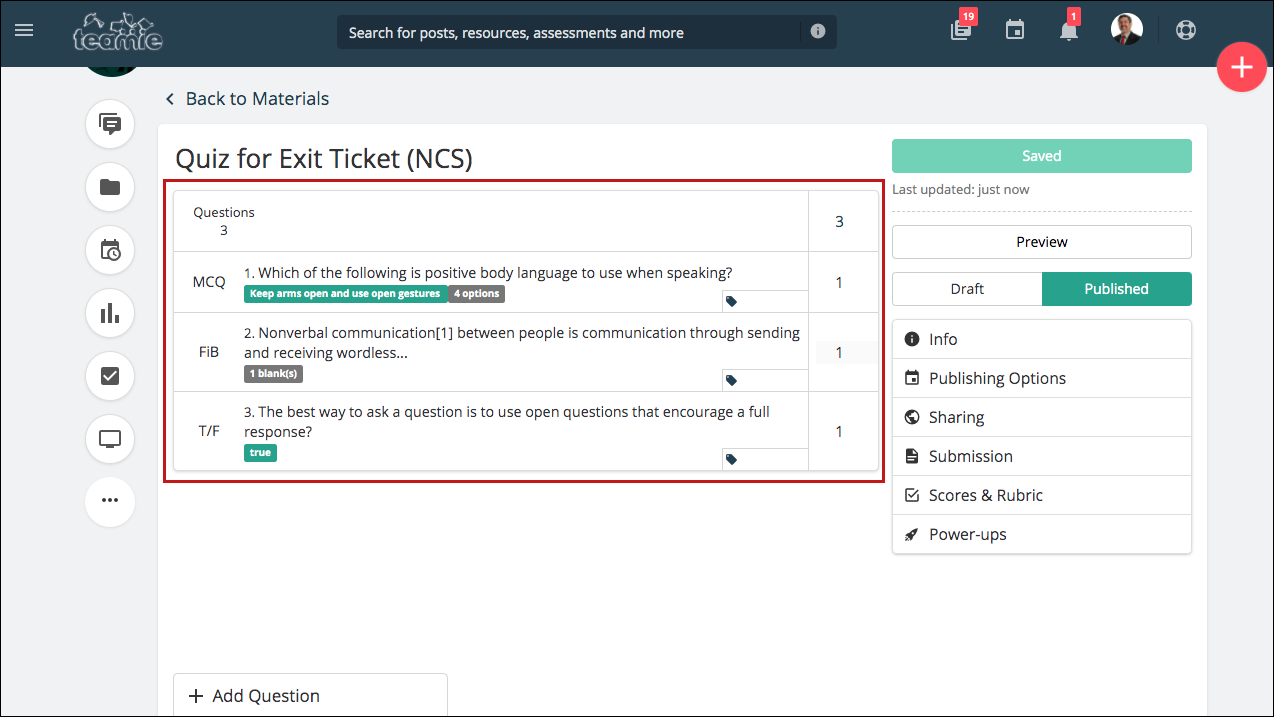
Now, you can edit/update the assessment with quiz questions/assignment instructions as usual along with other settings.
| ? An assessment enclosed in a lesson has restrictions around its published date and deadline, click here to learn more. |
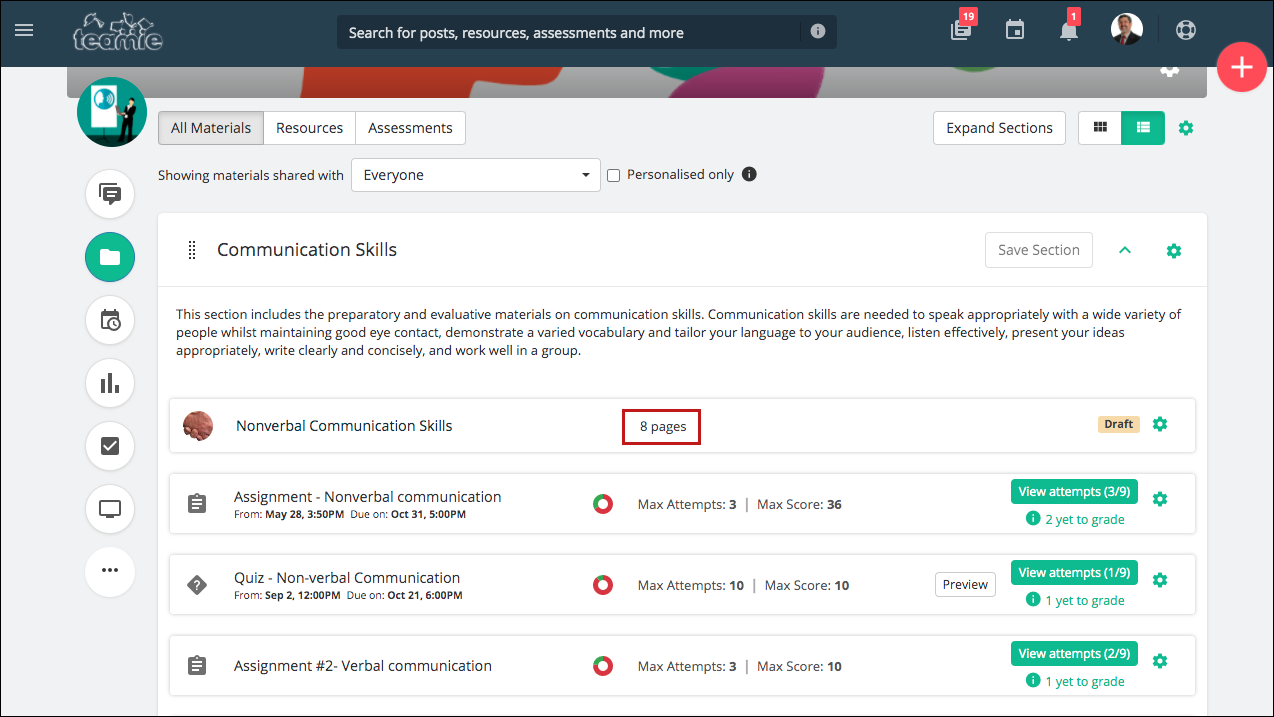
Once you add assessments in a lesson, the count of the lesson pages will increase as per the added assessment(s).
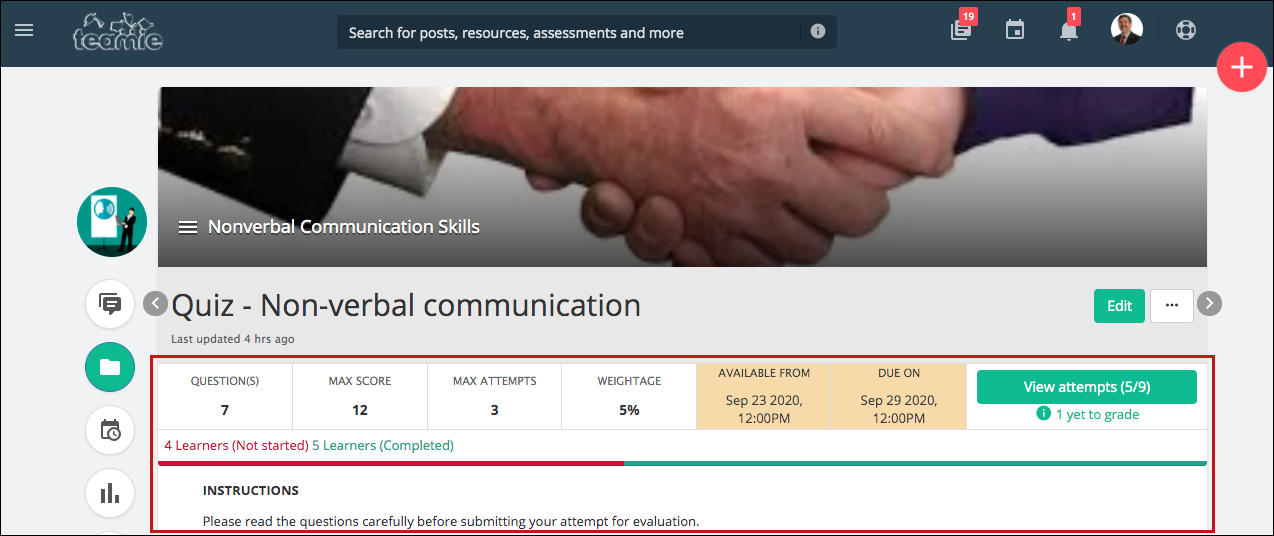
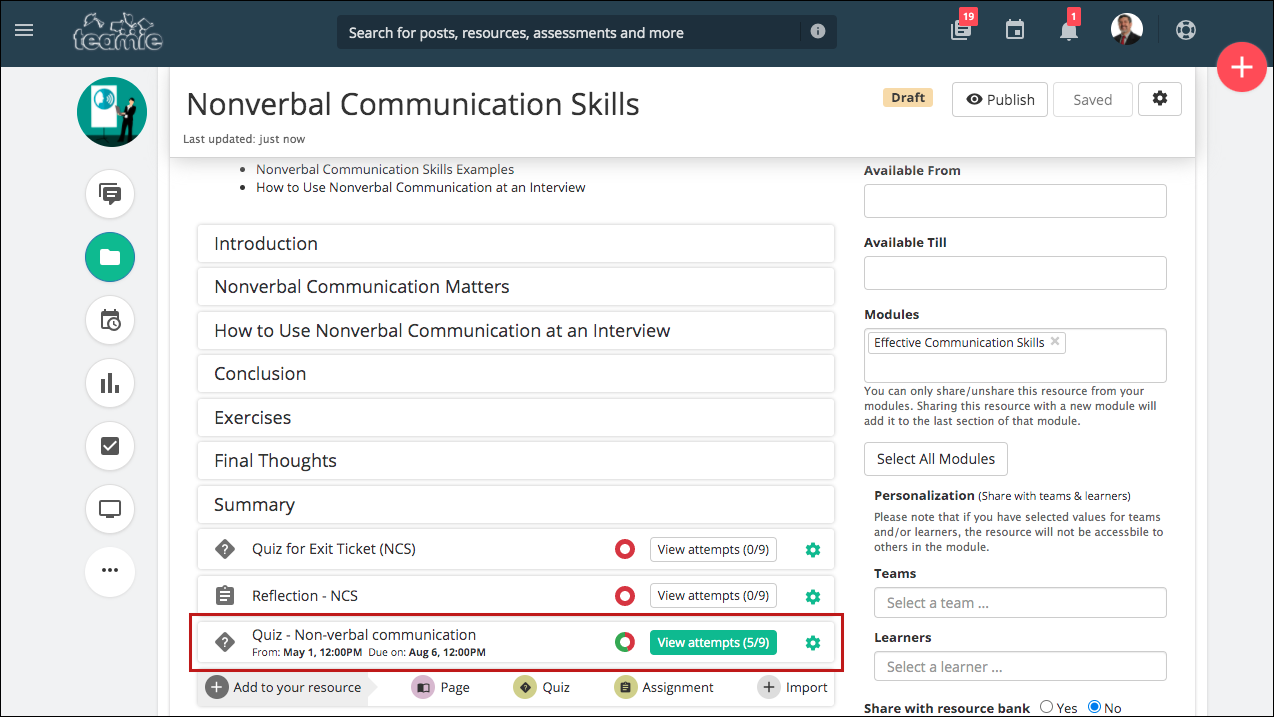
Once the assessment is published, it will show the details, such as the View attempts and settings buttons, in the lesson expanded view as well.
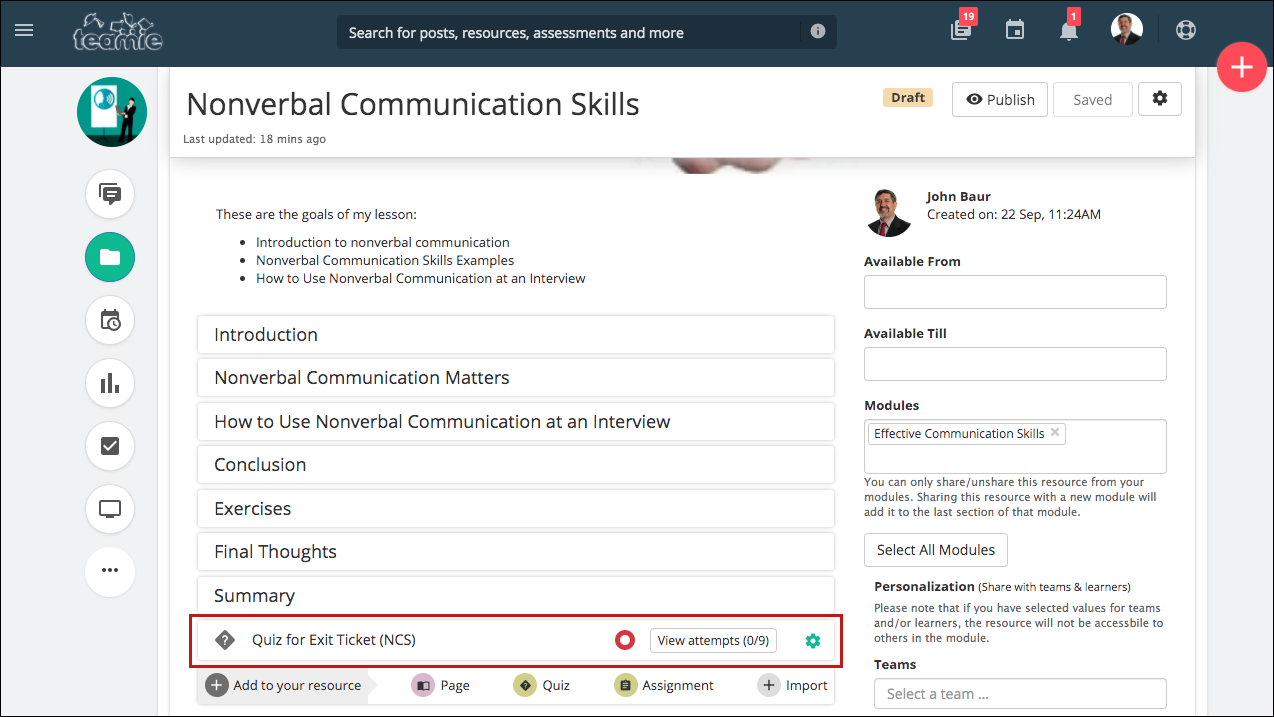
In addition to adding new assessments to a lesson, instructors can also link existing assessments of the classroom to the lesson using the Import option.
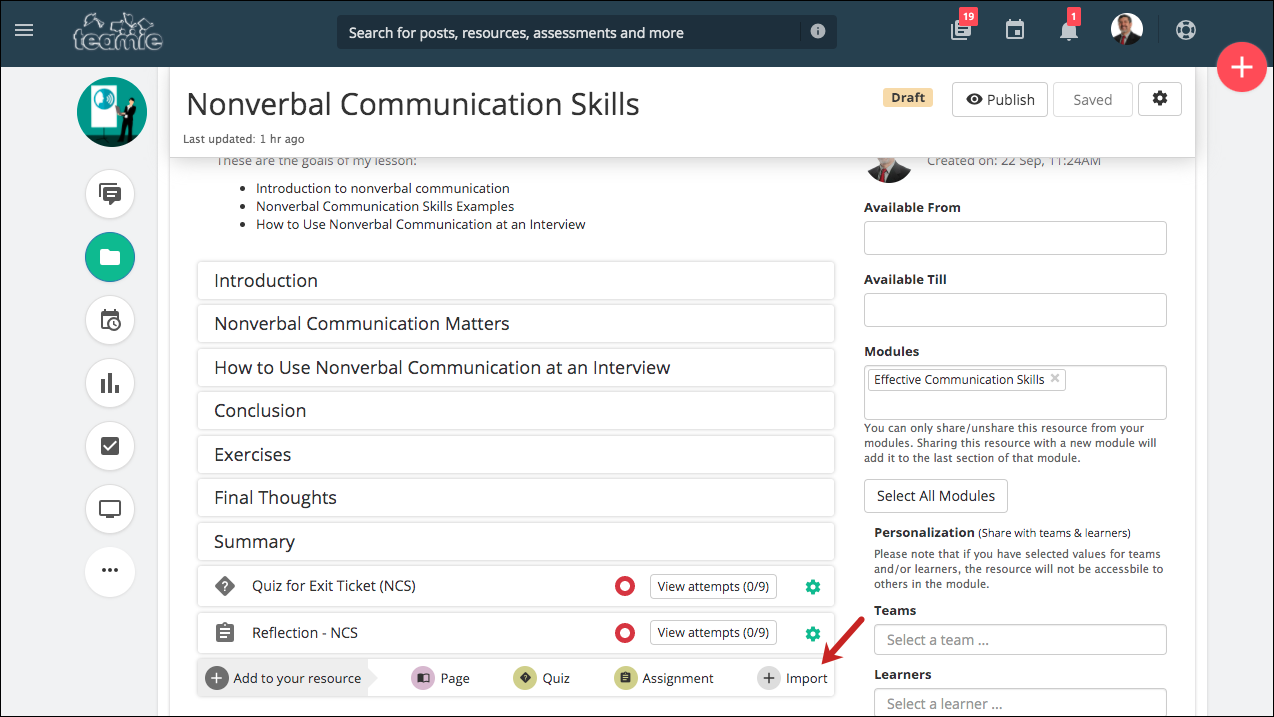
Clicking Import opens the Import Assessments page, showing all the assessments present in the classrooms, in their respective sections, except the ones that have already been linked to a lesson in that classroom. Select the required assessment and then click Import.
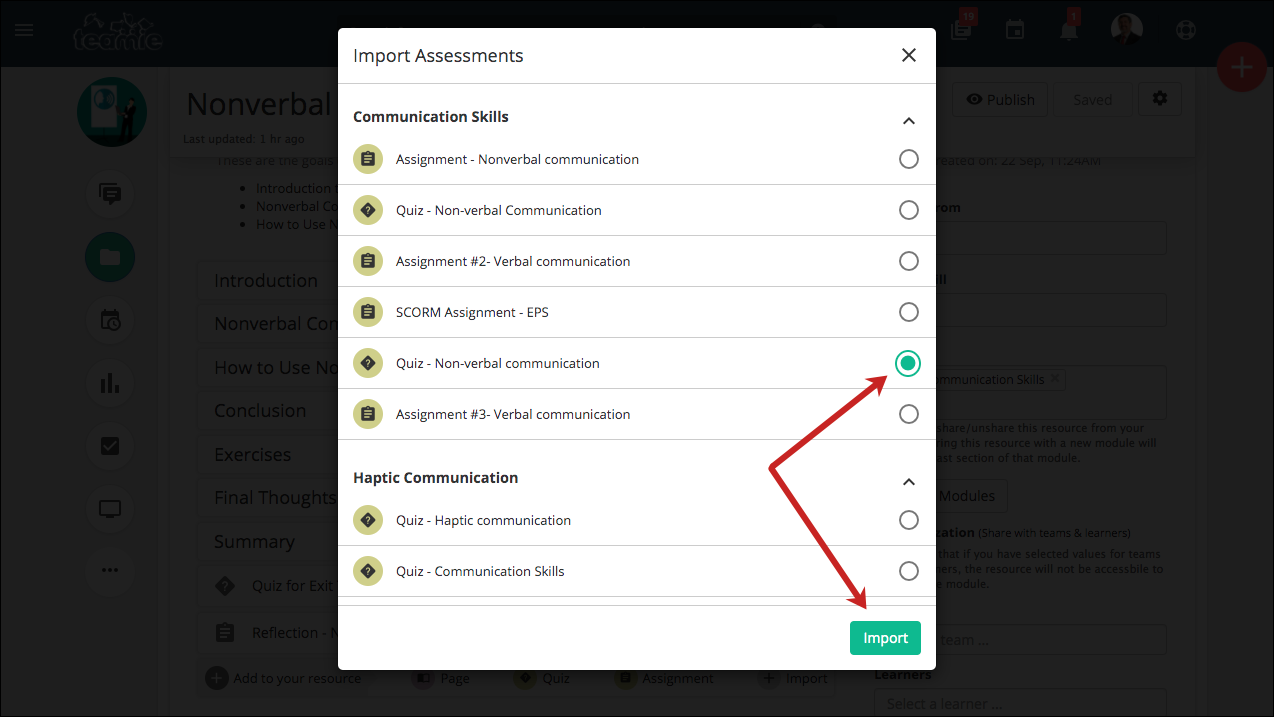
Similarly, you can import other assessments to a lesson page, one at a time.

If required, instructors can click the gear icon of a linked assessment and edit it.

Furthermore, as an instructor, you can delete the assessment linked to a lesson or unlink it from the lesson. Deleting the assessment will remove it permanently from the classroom.
Whereas, once the assessment is unlinked from a lesson, it will still remain a part of the classroom with all its current settings and in the All Materials page of the classroom.
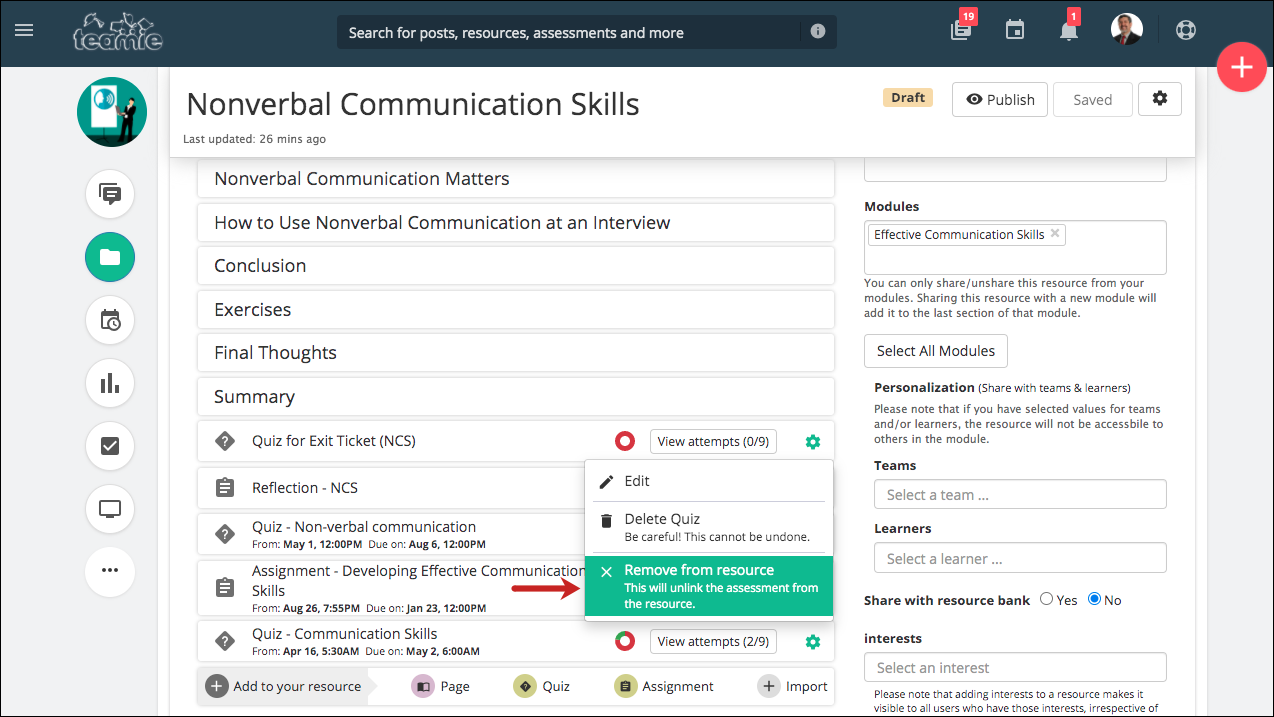

The unlinked assessment will be positioned right before the lesson it is unlinked from. Once an assessment is unlinked, the corresponding lesson page will also get removed from the lesson.
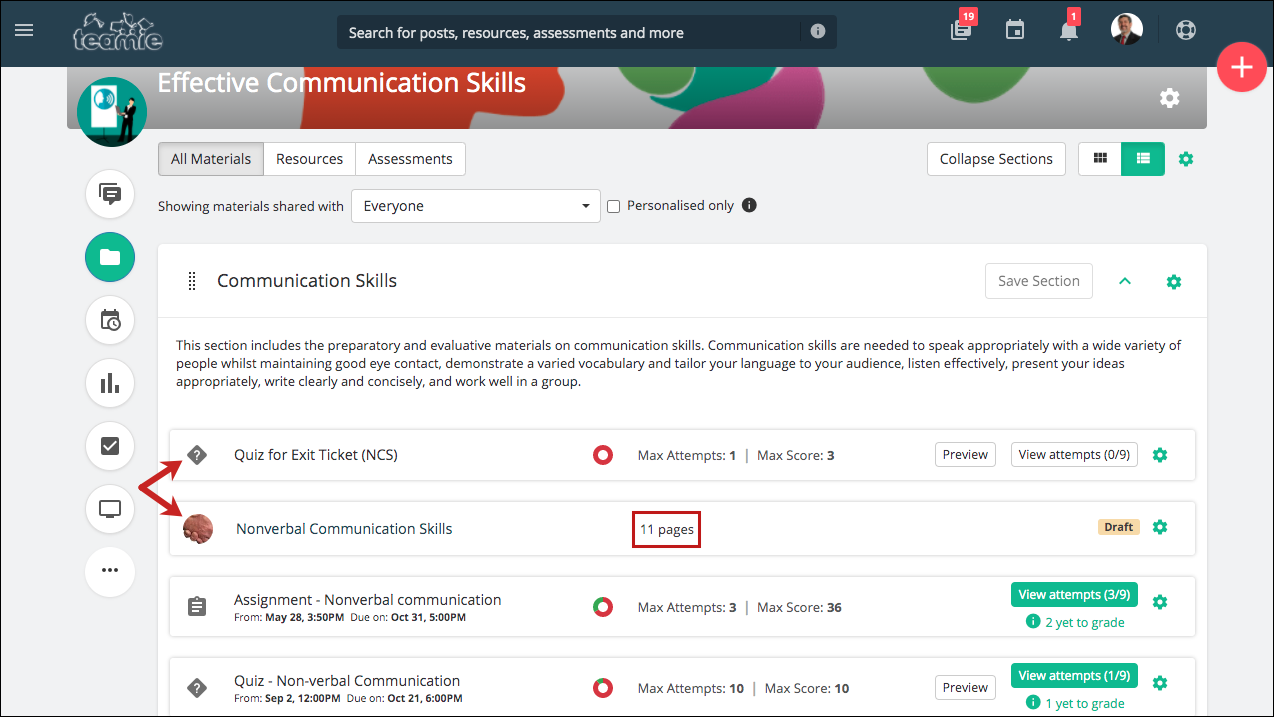
Assessments that are linked to a lesson will not be shown on the All Materials page. To access the linked assessments, click the Assessments tab on the Materials page. All the linked assessments will be shown along with other materials available in the classroom. The order and placement of the linked materials, in the sections, will be the same as that of the lesson. You will also be shown the lesson with which an assessment is linked.

| ? Similar to the lesson pages, you can reorder the linked assessment inside a lesson by grabbing the handles and dragging them to the required positions. |
Once the lesson is published, it will be made available to the learners. They will only be able to see pages (including assessments) that are published.
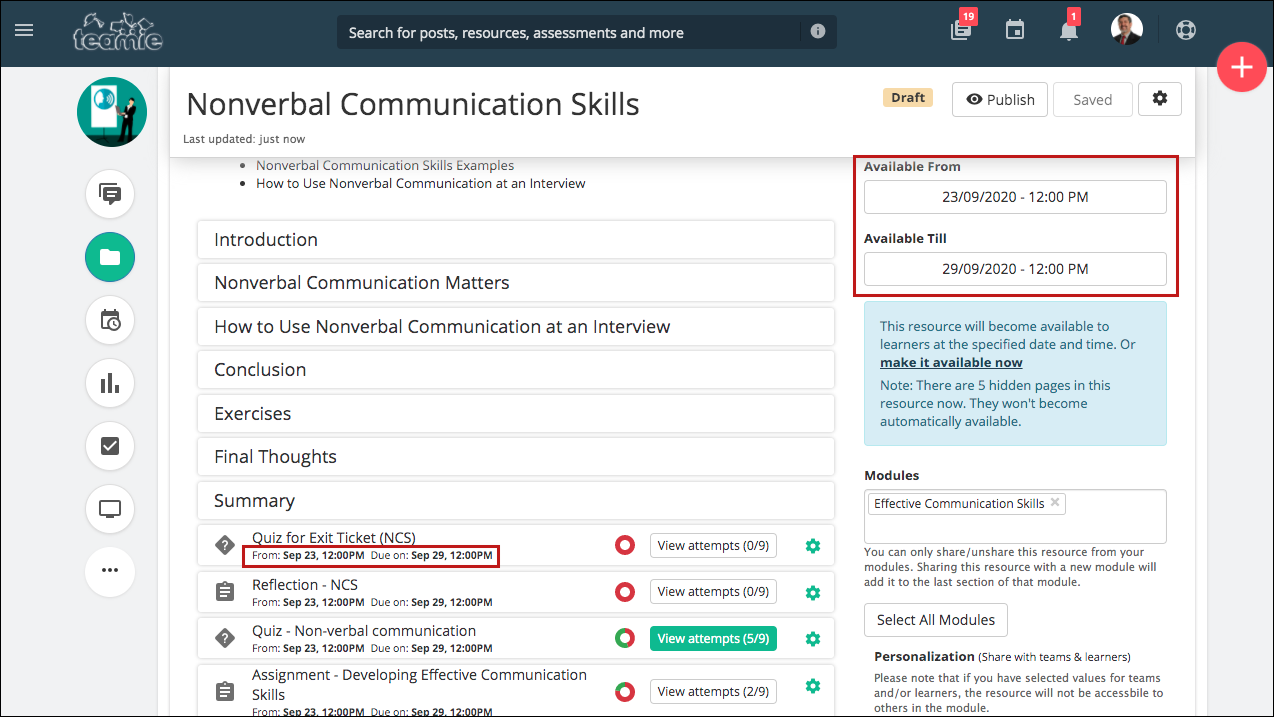
In case you set an Available From and/or Available Till date for a lesson, then the assessments’ dates will automatically get updated, in case they are not falling inside the lesson Available From and Available Till date already. You will be notified about the updated assessments availability dates to match the lesson availability, if applicable.
As the linked assessments appear inside the lesson, they need to be completed by the learners to complete the lesson. In the Dashboard view too, the assessment(s) are shown right before the lesson it is a part of. If there are multiple assessments in the same lesson, they will be shown in sequence.

We believe that this feature will enhance the flow of learning by allowing quizzes/assignments to be shown within the context of the lesson in the form of corresponding lesson pages. Kindly let us know what you think of this feature. Click here in case you wish to learn more about it.
Programs (Collection of Modules/Classrooms)
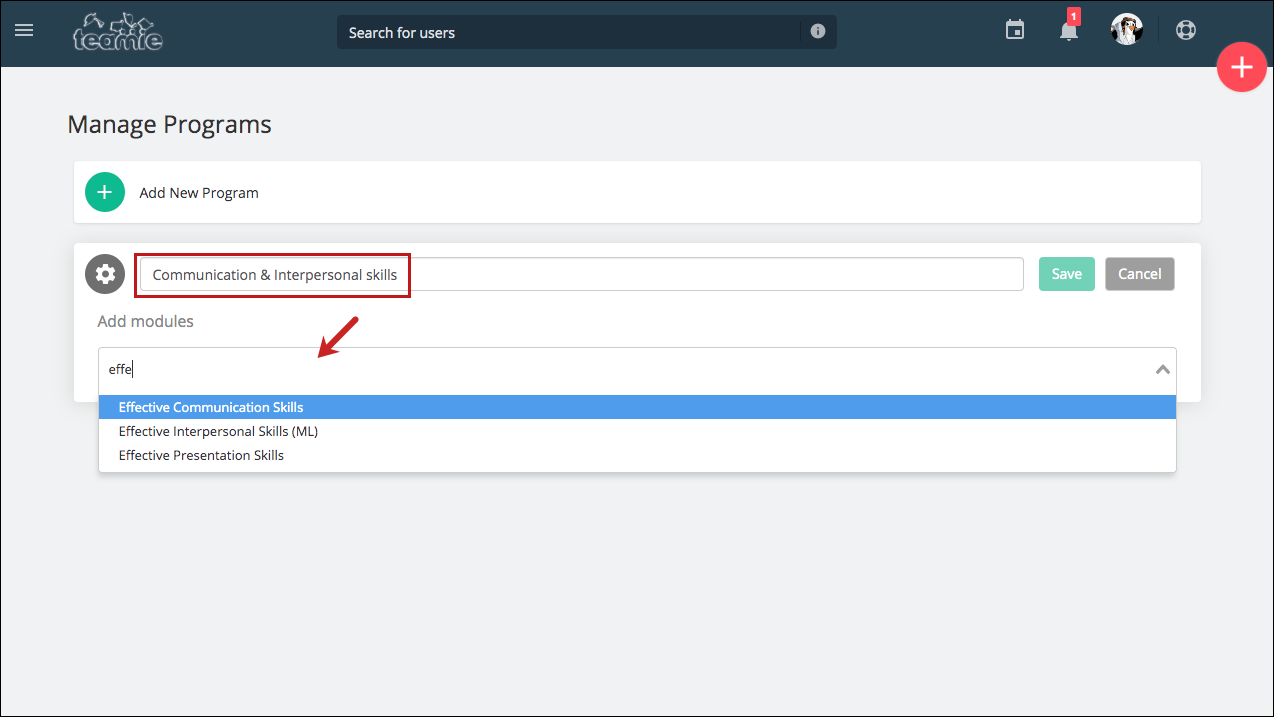
An administrator at site level can now create Programs and link classrooms to it. Programs will serve as a collection of modules at the site level. As an administrator, you can create or edit programs from the Manage Programs page from the sidebar.

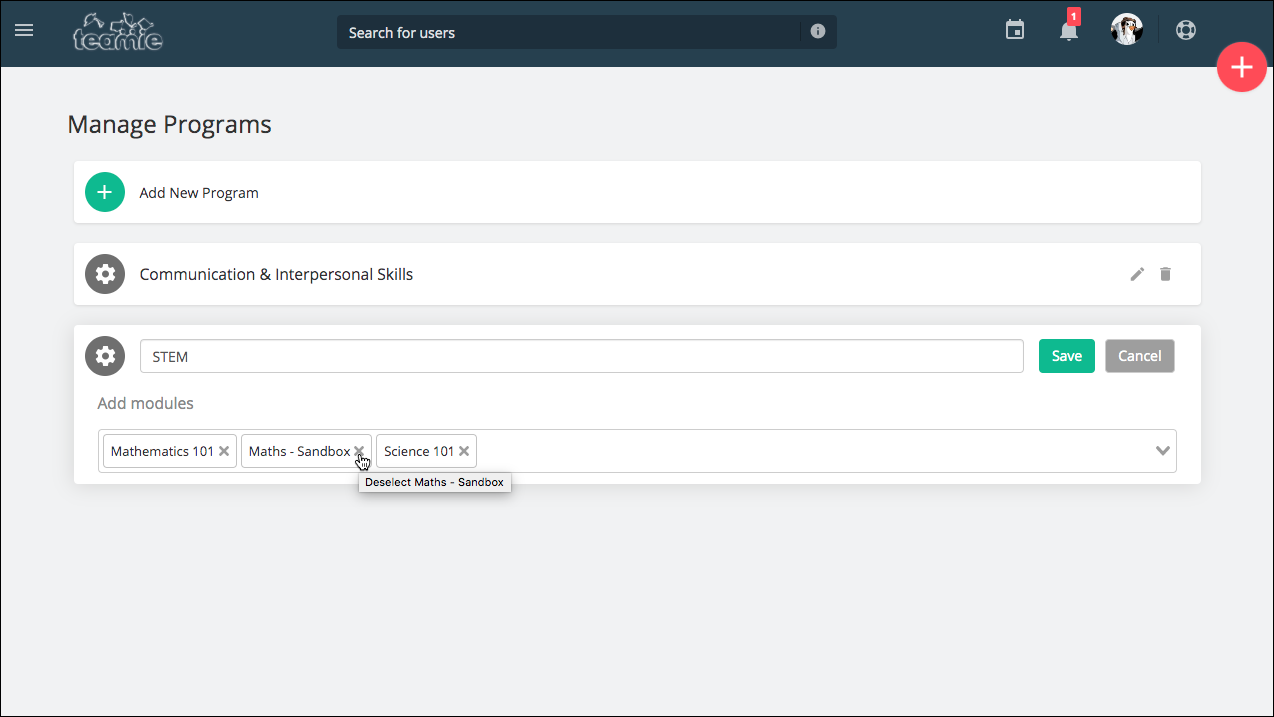
Once you create a program, you will be able to search and link module(s) on your site to that program.
| ? You can link a module to only a single program at the site level. |
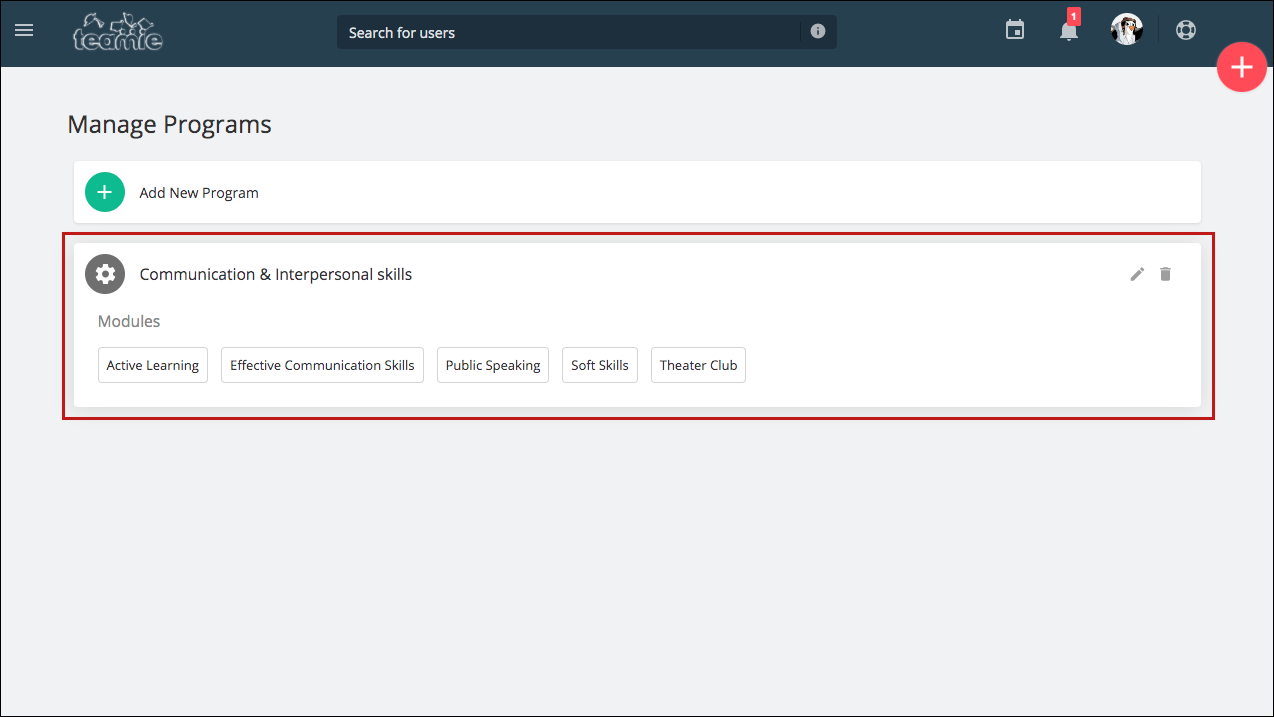
You can also edit a program to link new modules or unlink existing modules from it.
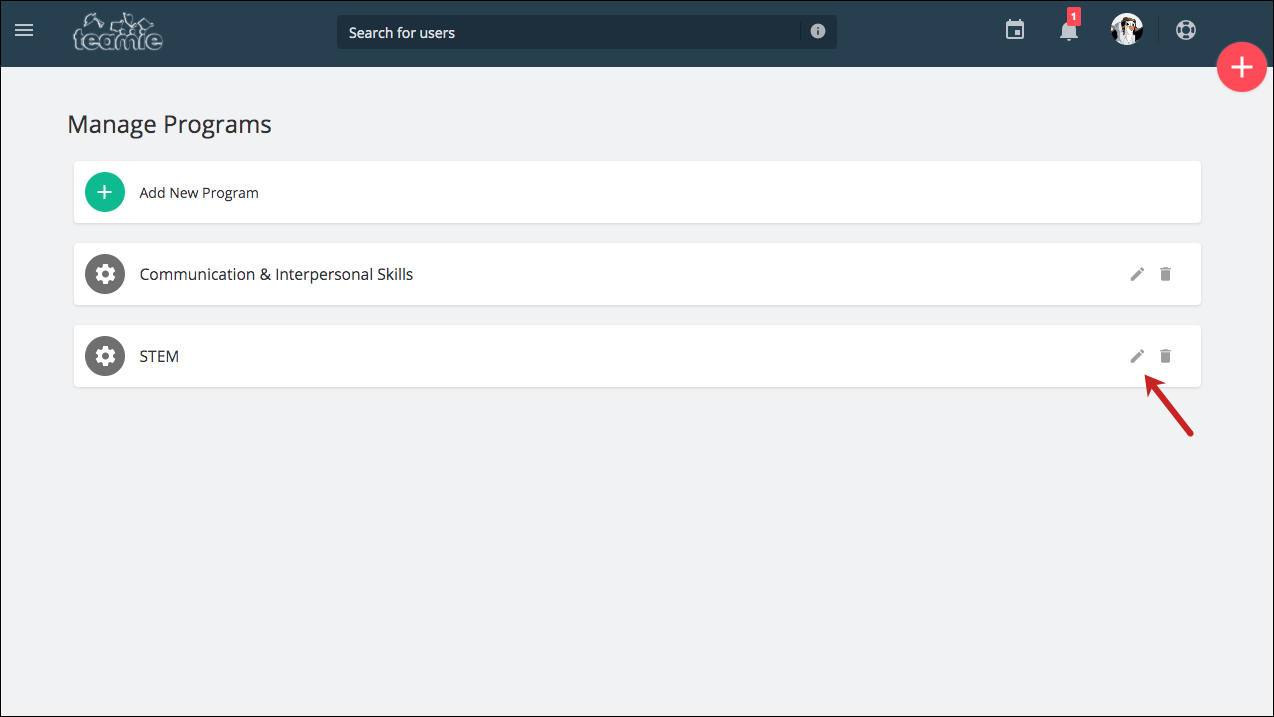
If required, you can also delete a program. The program will be deleted, and the module will be unlinked from the program. Kindly note that the module will not get deleted for the learners and will now show under ‘No Program’ category for them.


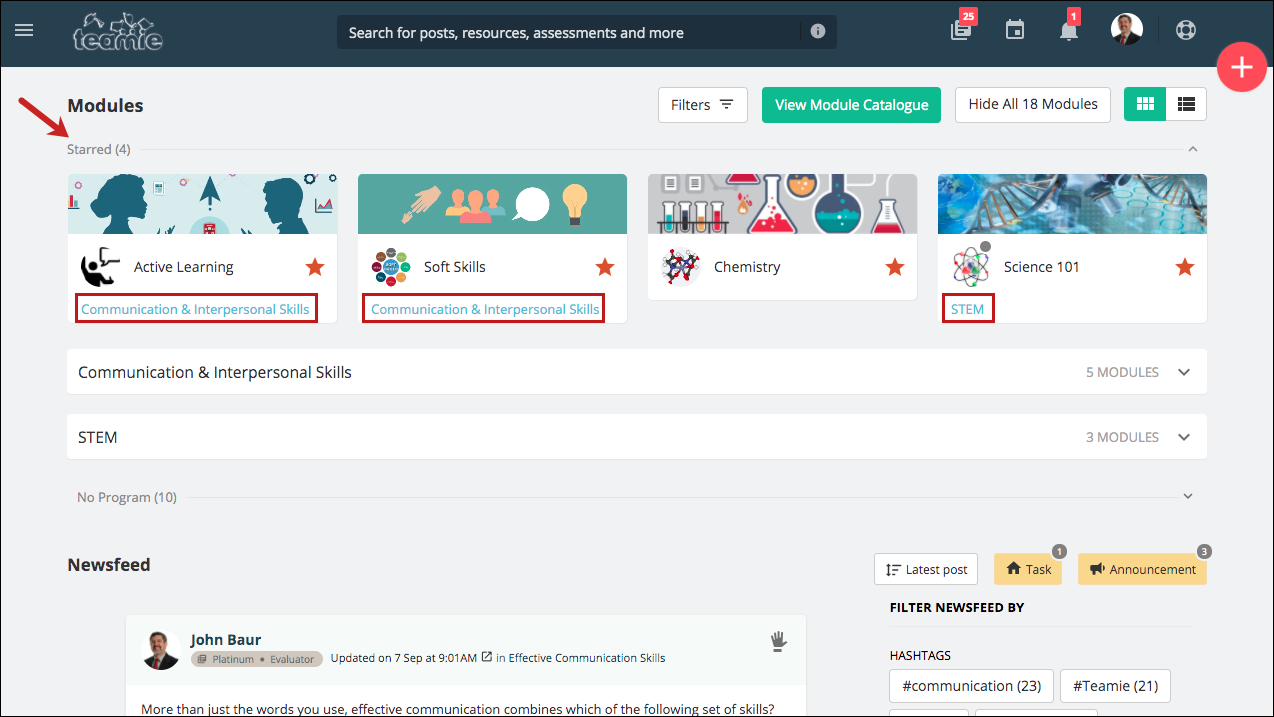
In the learner dashboard, modules will be listed under their respective programs. Each module card will have the completion status (In progress, Not started, Completed, Not successfully completed) indicated on it, with a color surrounding the thumbnail. The list of modules inside a program will be in alphabetical order.
Note: Modules that are not a part of any program will appear in a separate No Program category.
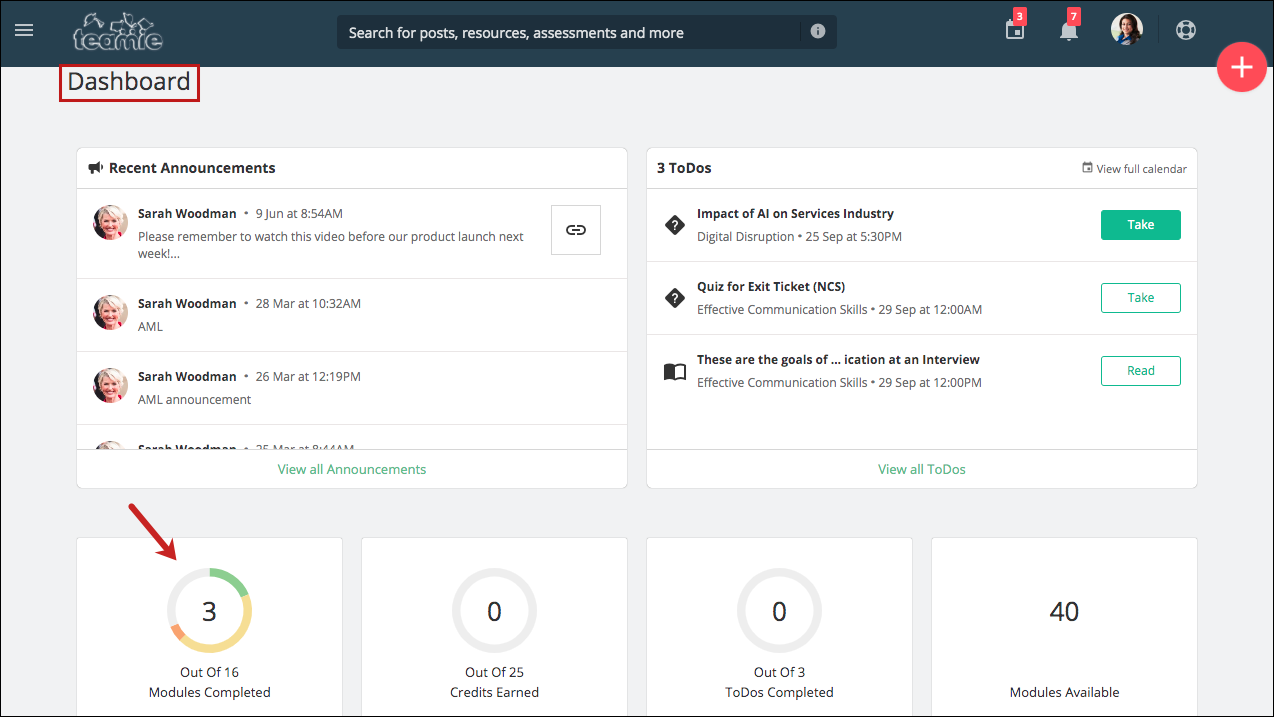

You can filter the modules based on their completion status:
- Completed
- In progress
- Not started
- Not successfully completed
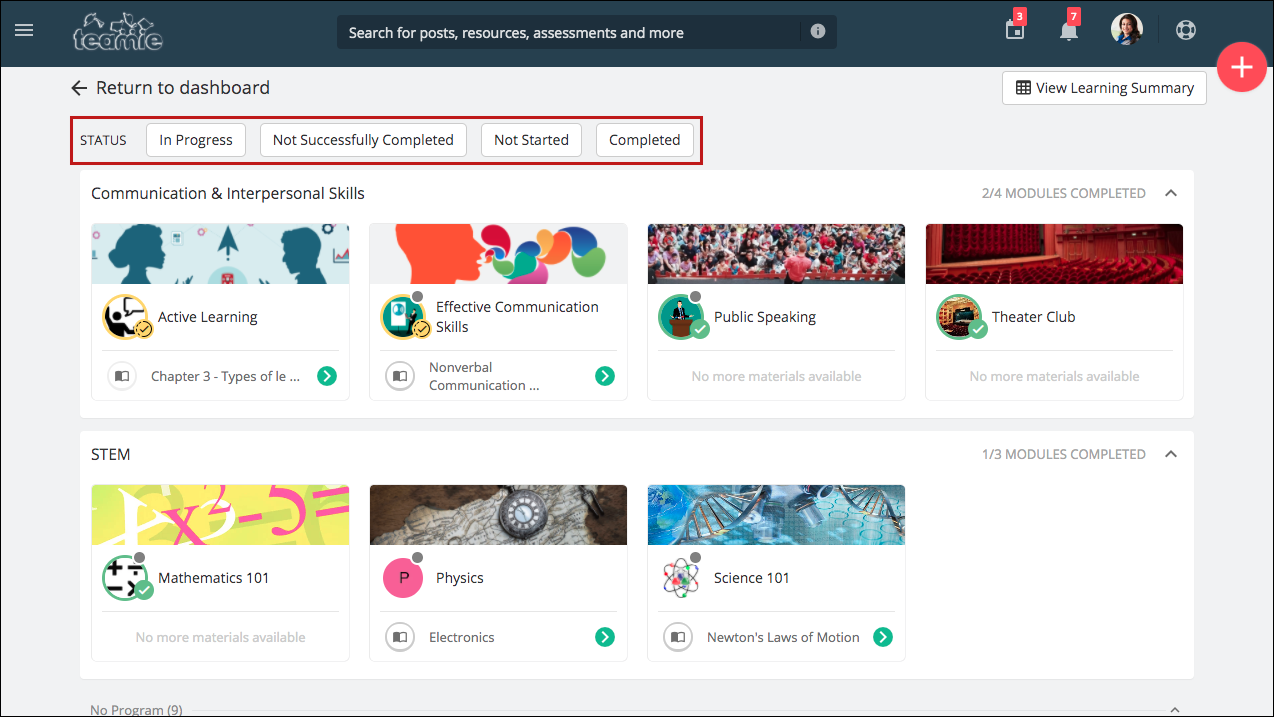

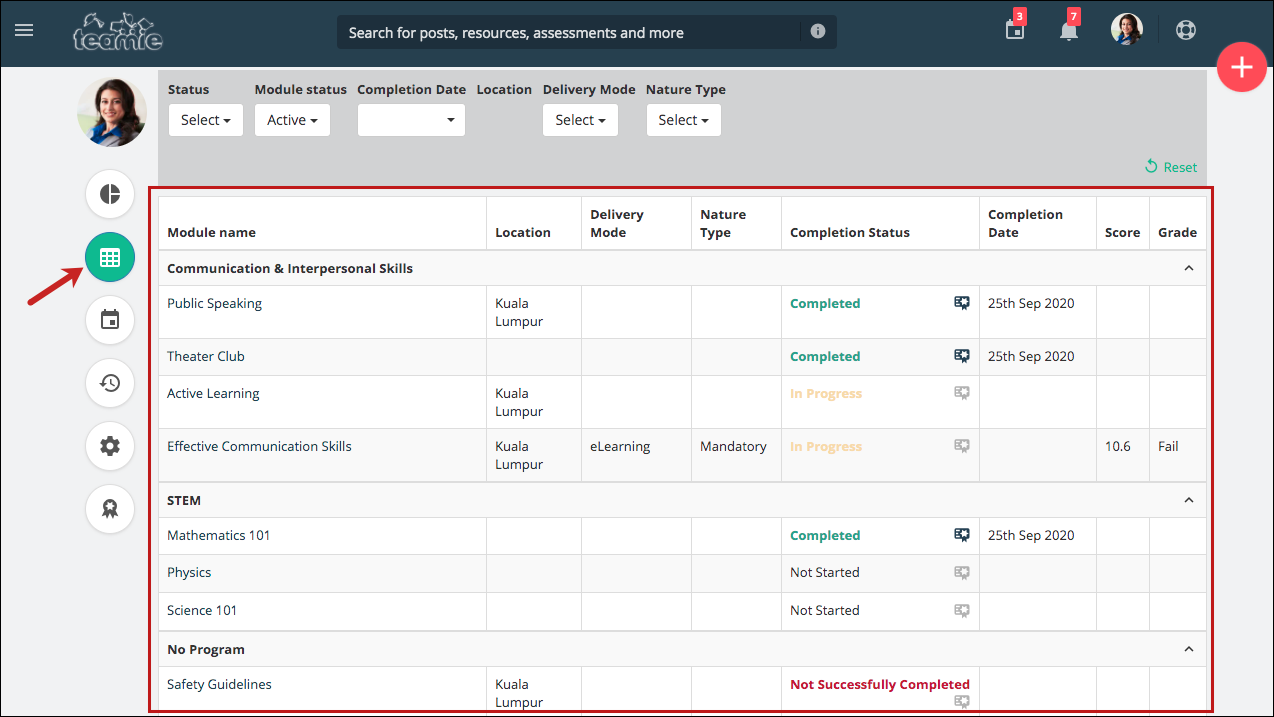
For learners, the modules will also be shown categorised under their respective categories, along with the No Program category, on the Learning Summary page.
Furthermore, the Module Catalogue can be filtered to show the module linked to the selected program while enrolling in a module.

As an instructor, you can view the modules grouped under their respective programs on the homepage. By default, the programs will be in collapsed form and the information regarding the number of modules linked to that program will be shown for each program. Modules that are not part of any program will appear as a separate category at the end under the No Program section.
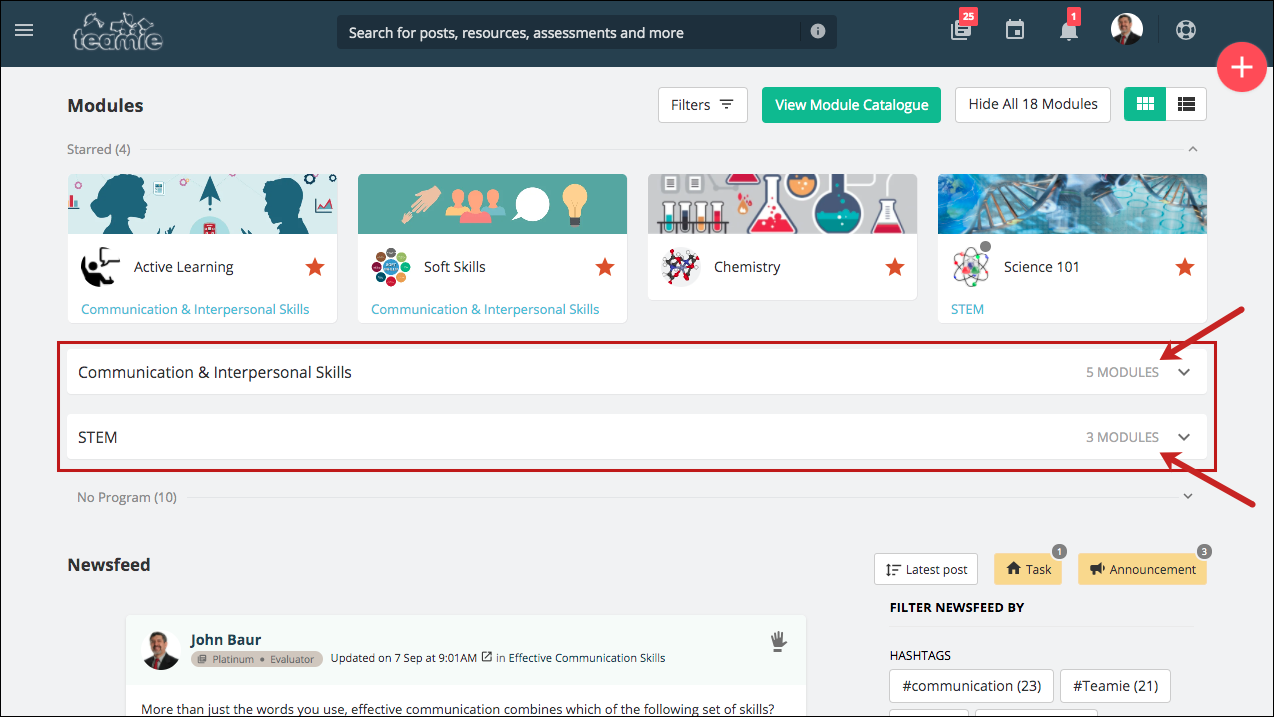
In case you have starred a module that is linked to a program, then the program name will be shown below the module title.
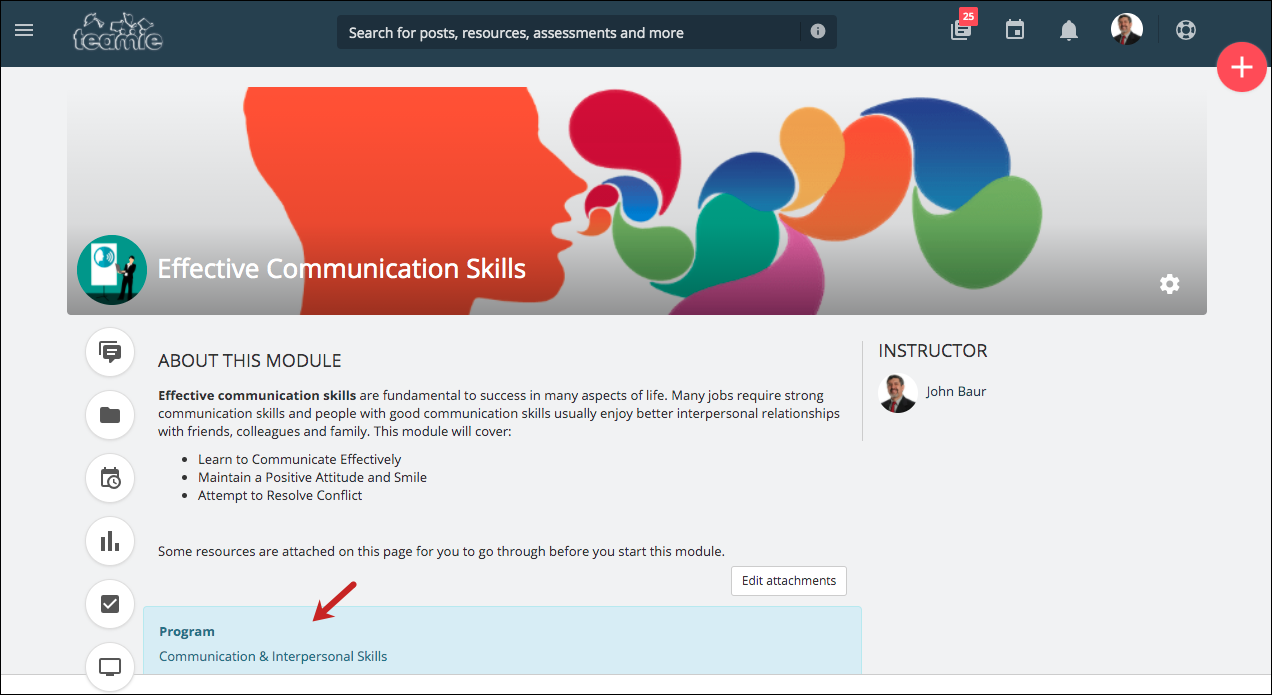
| ? The program with which a module is linked will also be mentioned on the About page of that module. |
Give us a shout-out if this feature of organising modules under programs helps you structure your learning in a better manner.
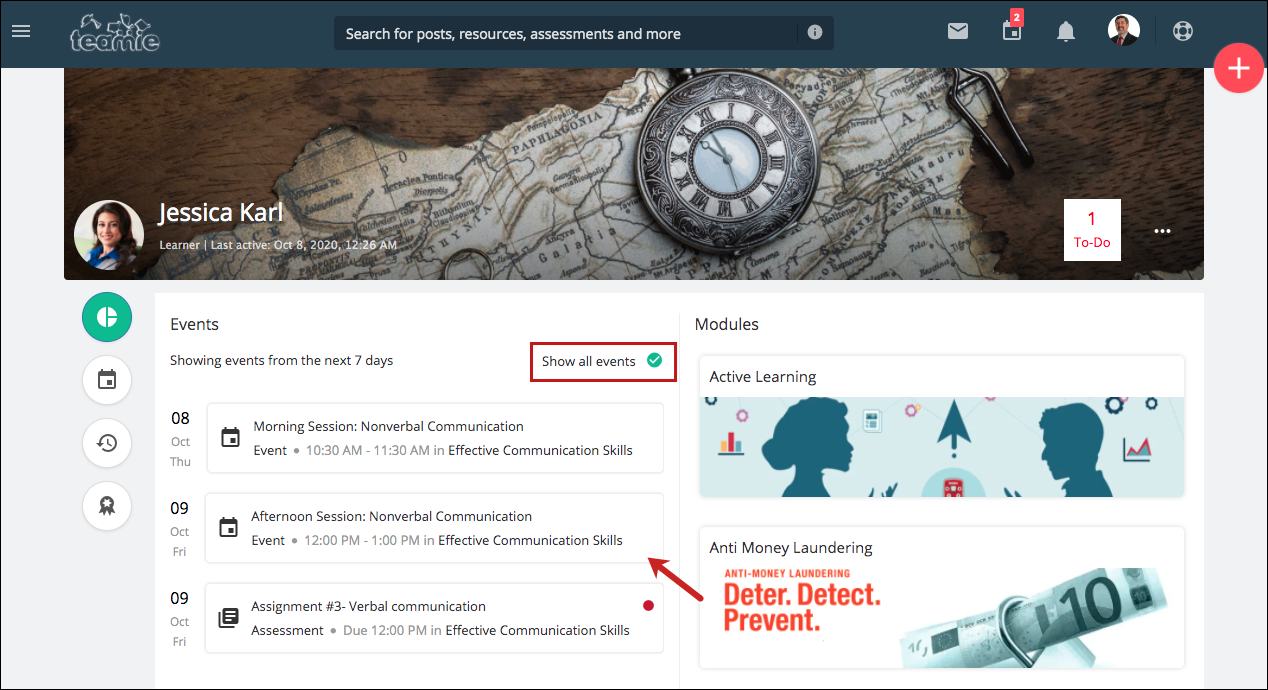
Attendance Revamp
We have revamped the attendance system on Teamie to make it more user friendly and efficient. As an instructor, when you create a calendar event for a classroom, you will now be able to mark attendance for all the learners of that classroom for that event.

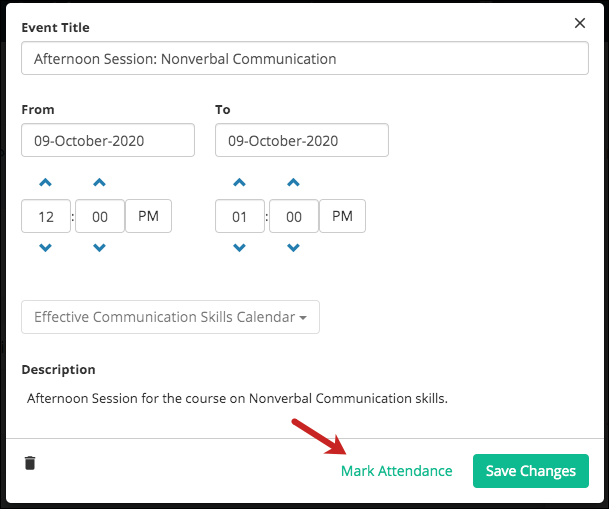
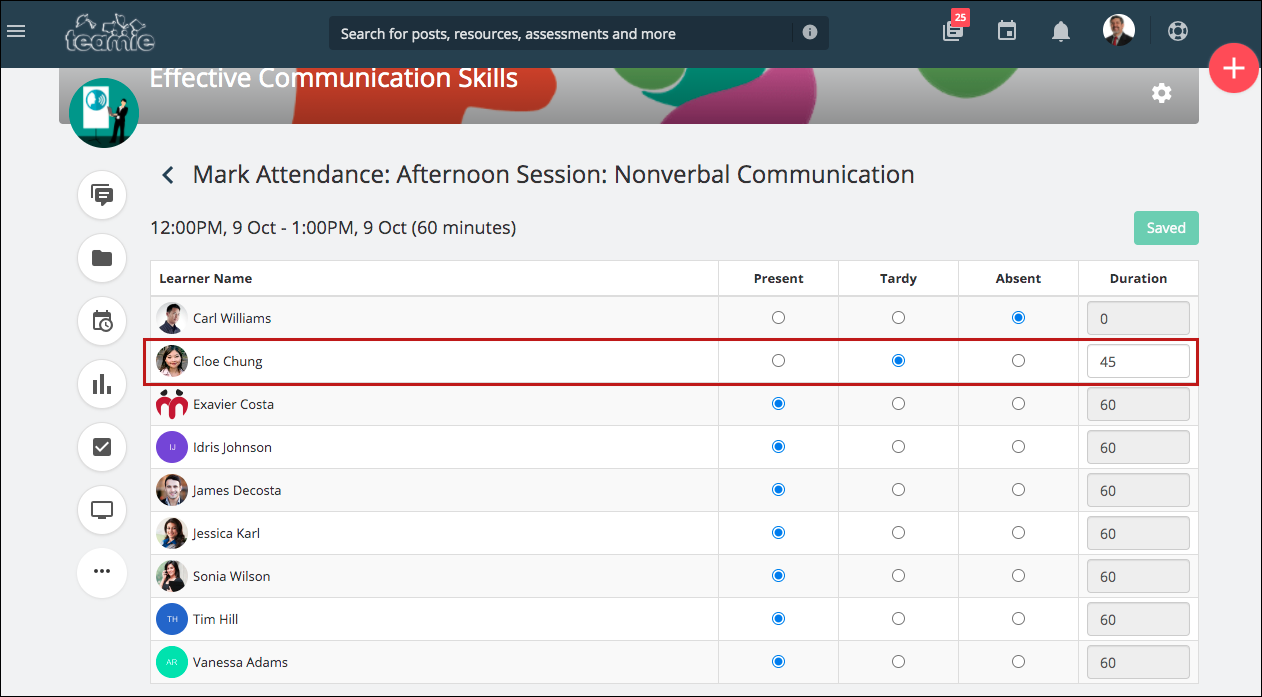
The Mark Attendance page opens. It will show the total duration of the calendar event, and all the learners will be marked as ‘Present’ by default. Present status will award the full duration of minutes to the learner for the event.
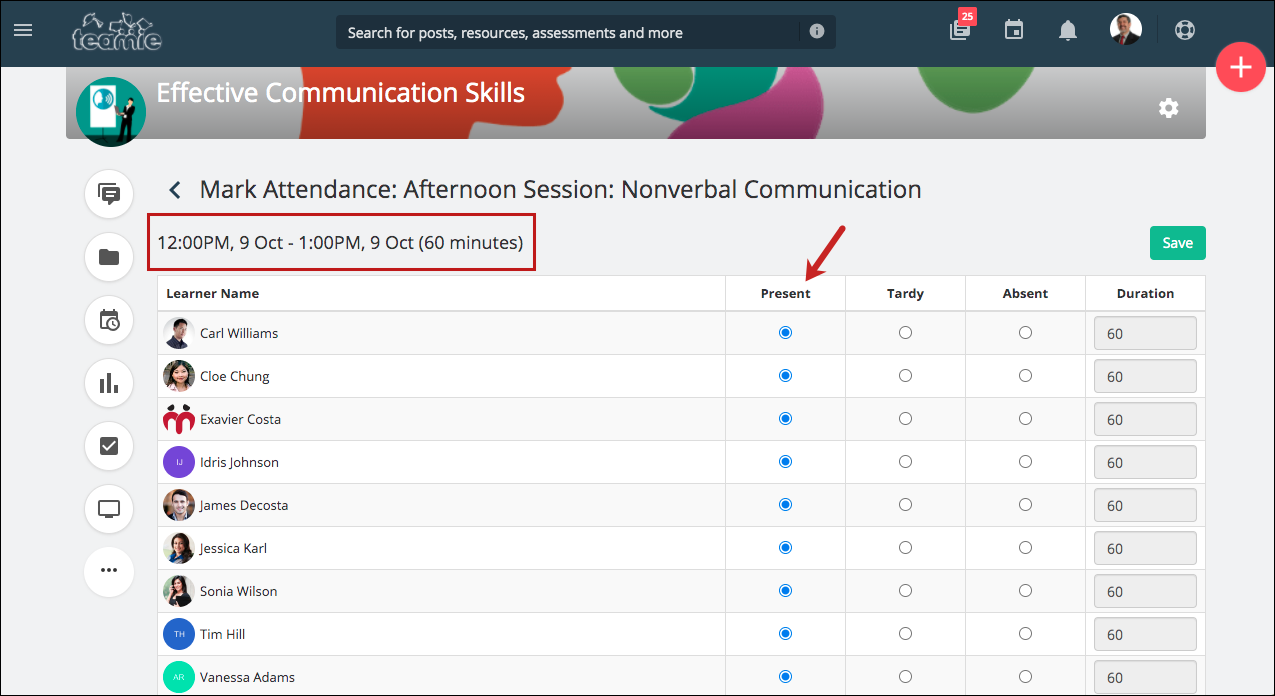
You can mark a learner as ‘Absent’ and then ‘0’ minutes will be awarded to the learner for that event.

In case a learner has been late for the event or has not attended it for the full duration, then you can mark the attendance as ‘Tardy’ and set the duration for which the learner attended the event.
Note: The aforementioned three statuses are white labelled and can vary from site to site. Furthermore, additional statuses can also be configured at the site level.

The attendance report for all the classroom events can be accessed by the instructors from the People page.

The Attendance Summary page will show the combined duration of all the events created in the classroom. It will also show a table listing all the learners and their combined attendance duration for all the events. A percentage of attendance achieved out of the total attendance will also be shown for each learner. You can also access the detailed attendance report from this page.

On the Attendance Detailed Report page, all the classroom events will be listed along with the attendance status of learners in the corresponding events. You can click any event to quickly mark the attendance for it.
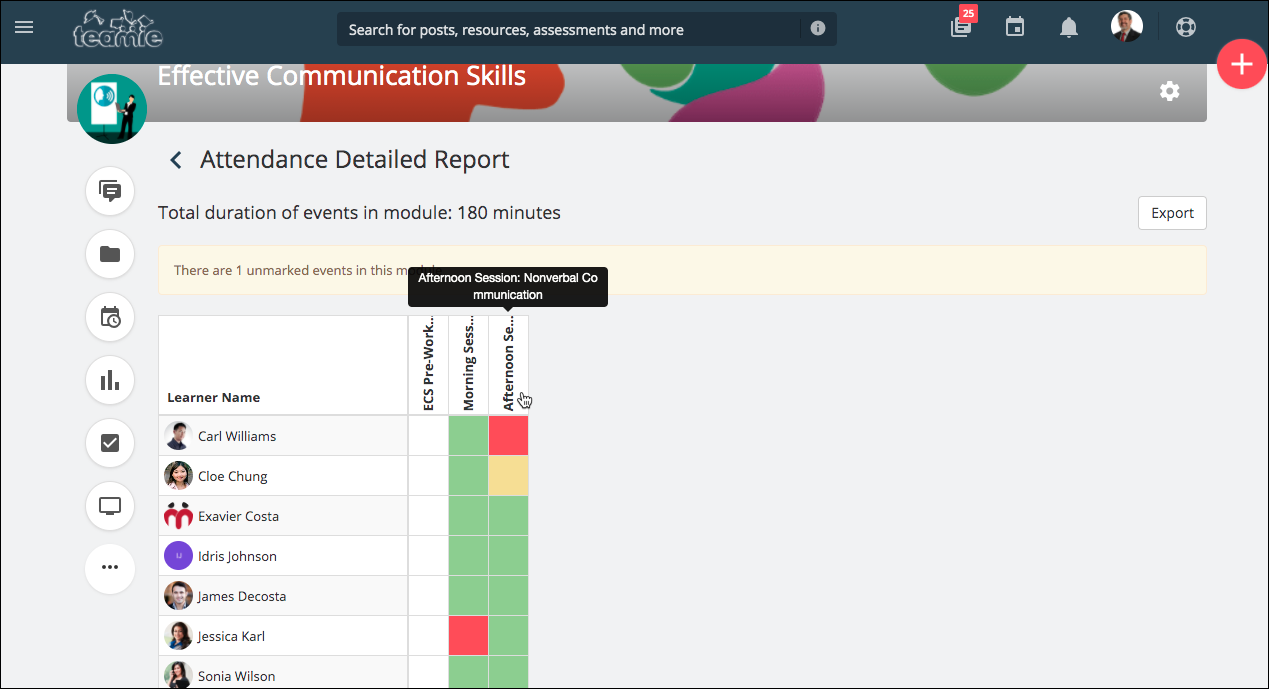
You can hover over the events for the corresponding learners to view their attendance status along with the duration attended. Furthermore, you will also be informed about the number of events that are unmarked in the classroom.

An Export button is available on the Attendance Detailed Report page to export all the data into an excel sheet.


| There is a restriction of the time period during which the attendance can be marked for a calendar event. This can be configured at the site level. For instance, in the following scenario, an instructor can only mark attendance for calendar events that are within 10 days in the past or 5 days in the future. |

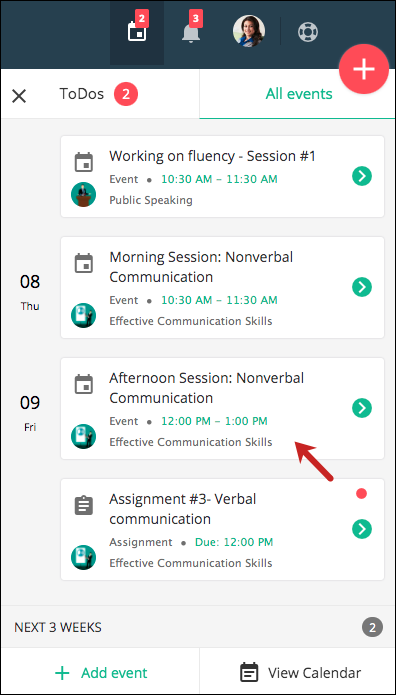
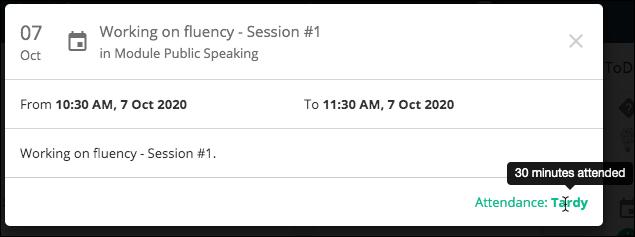
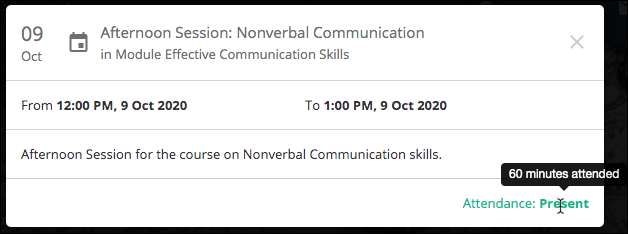
Learners will be able to view their attendance from the calendar event full view.

They can also view the attendance duration by hovering over the attendance status.
Parents can also view the attendance of their ward(s) by viewing all events from the profile page.
We will be making enhancements to the attendance workflow to include a leave of absence form and much more in upcoming updates. So, stay tuned to our updates. This is not it! Instructors can also mark attendance and learners can check it on the go from the Teamie mobile apps as well 🙂
Classrooms’ About Page Attachments
Instructors can now add attachments on the About page of their classrooms. These attachments can be documents, audio or video files. This can help in giving an improved overview of the classrooms to its members. In case the classroom is open for enrollment, then the users can get to know more about the classroom before enrolling.
As an instructor, you can add single or multiple attachments on your classroom’s About page and reorder them as per your requirements.

Once you save the added attachments, they will be shown in their full view and act similar to how attachments work on the platform.

Any audio or video attachments will be transcoded accordingly for best user experience.
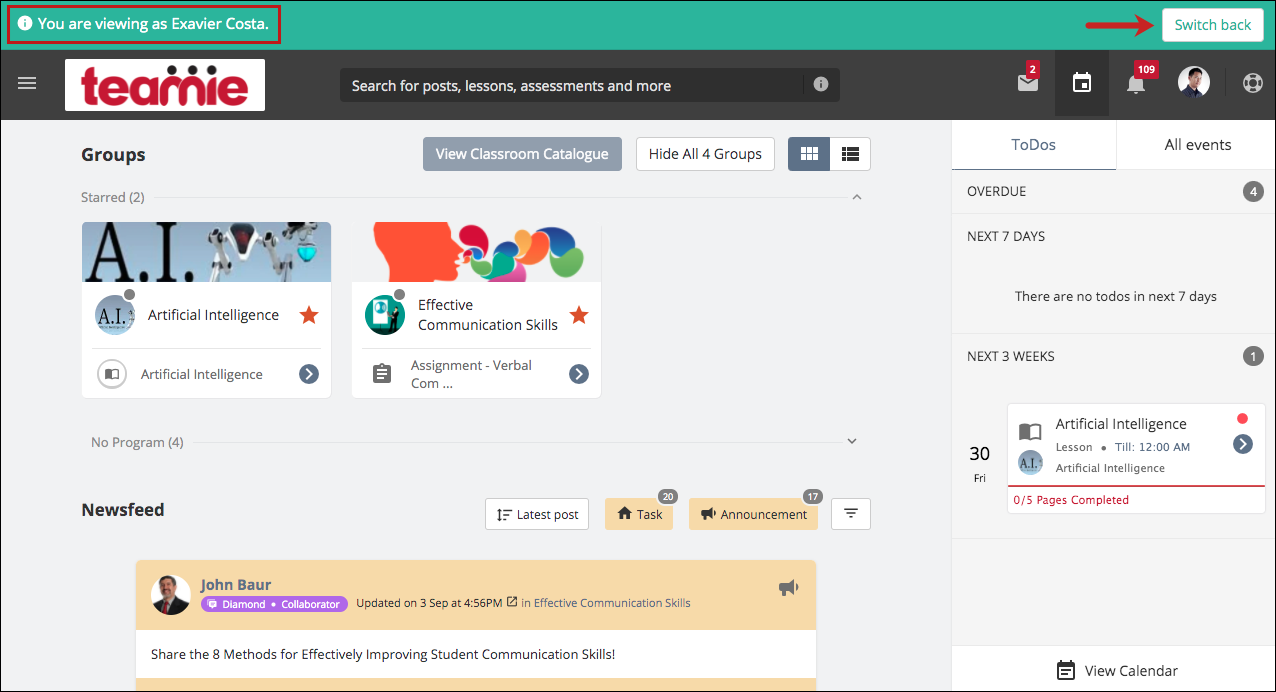
View as a Learner Option (Instructors)
Administrators at the site level have the option to masquerade as any user on the site and perform any actions as them, which can help troubleshoot issues. Such permissions can also be helpful for instructors to an extent. So, keeping that in mind we have tweaked some permissions at the site level to allow instructors to view as a learner.
Instructors can only view the actions performed by a learner and not perform the actions on their behalf. So as aforementioned, this option is similar to what administrators have in the form of masquerade. The major difference being that unlike the masquerade setting, the view as setting will only allow instructors to view how the site is appearing for learners without actually taking any actions on their behalf.
As an instructor, when you search for a user, a View as link will appear in front of the learner’s name.

Once you select this option, you will be virtually logged in as that learner with the ability to view the site as they would do. Although, keep in mind that you would not be able to take any actions on learners behalf. Click Switch back to return to your account.
Minor Enhancements
Following are some minor enhancements that were rolled out to make your Teamie experience even more awesome!
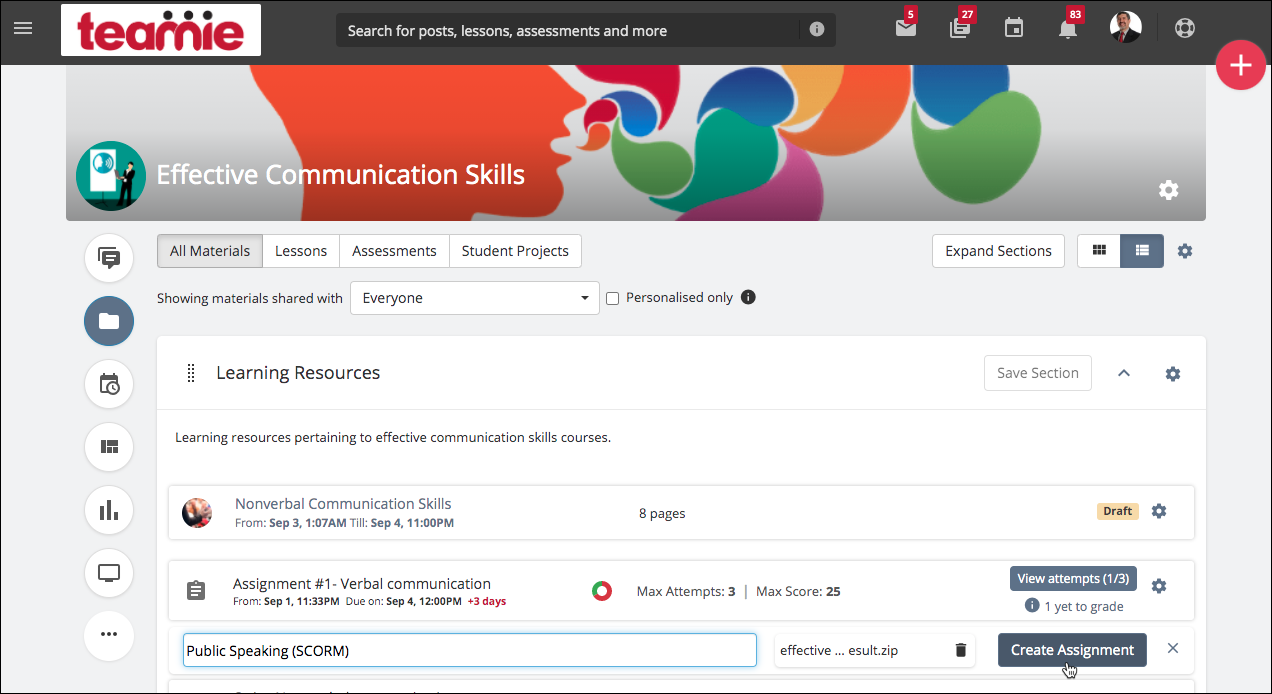
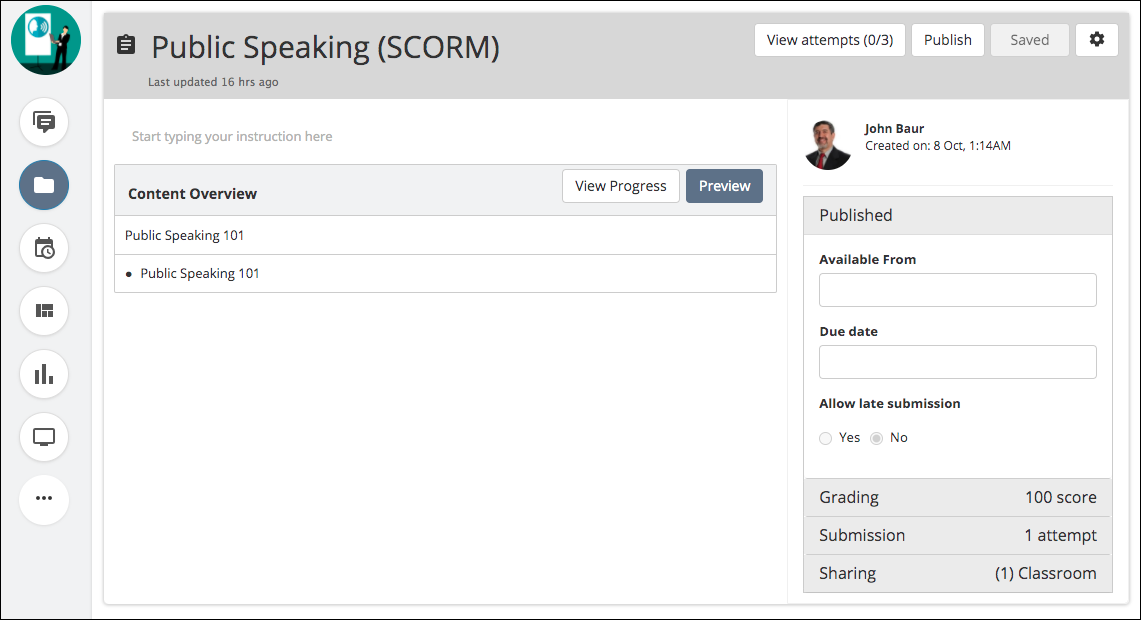
SCORM Assignment Creation in Dash
In our earlier update, we migrated SCORM lesson creation to Dash. Now, we have migrated the SCORM assignment creation to Dash too for a consistent user experience.
Similar to how you create other materials, you can now create a SCORM assignment inside a classroom using the user-friendly interface. All you need to do is add the assignment title and upload the SCORM package from your system.
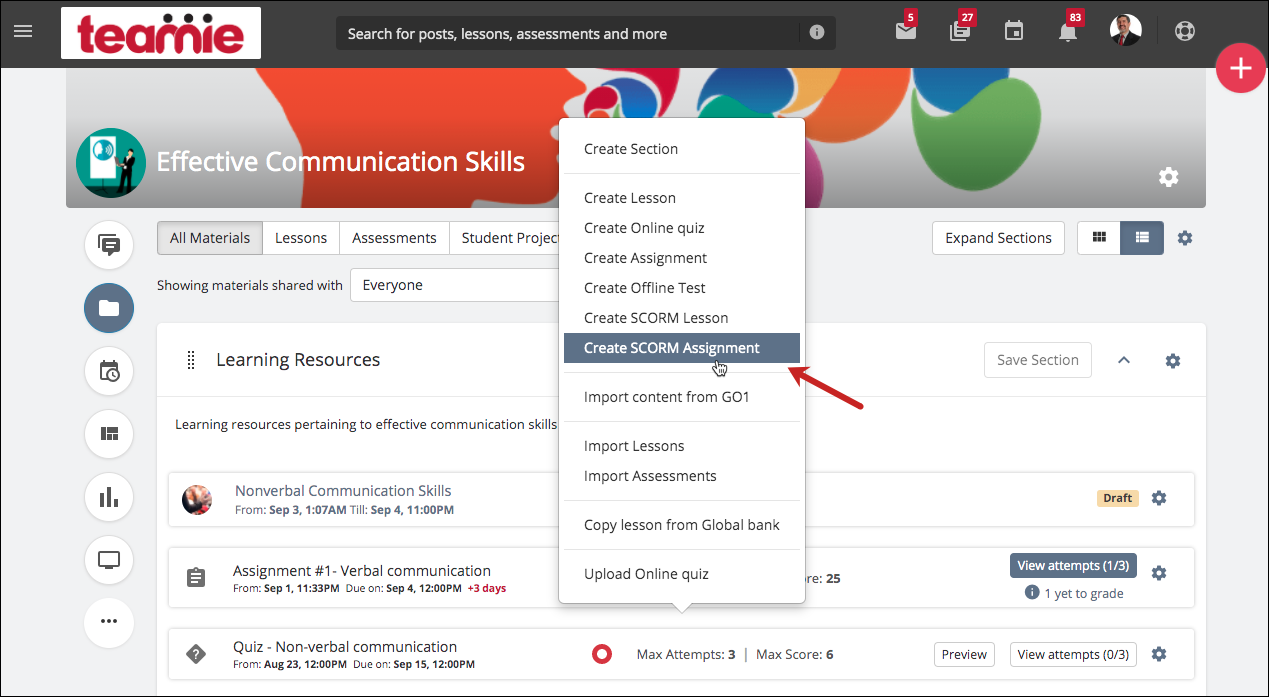

Once you have added the assignment title and uploaded the SCORM package, just click Create Assignment to add the SCORM assignment to the classroom.
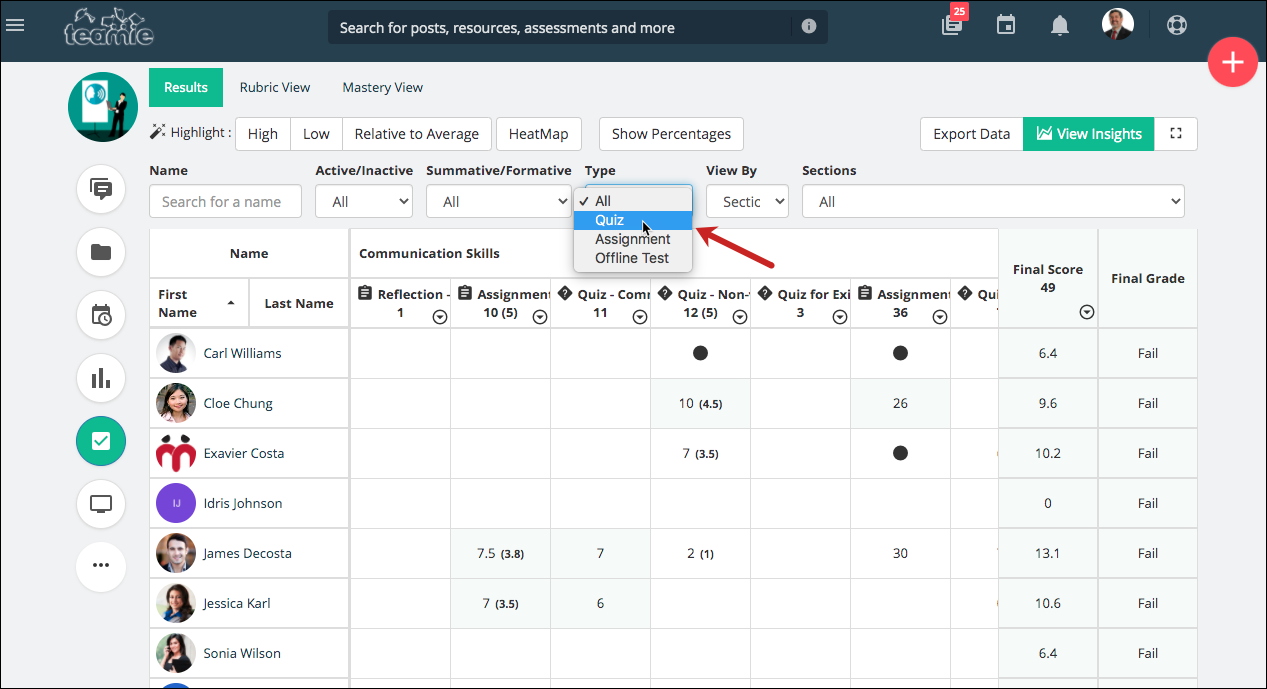
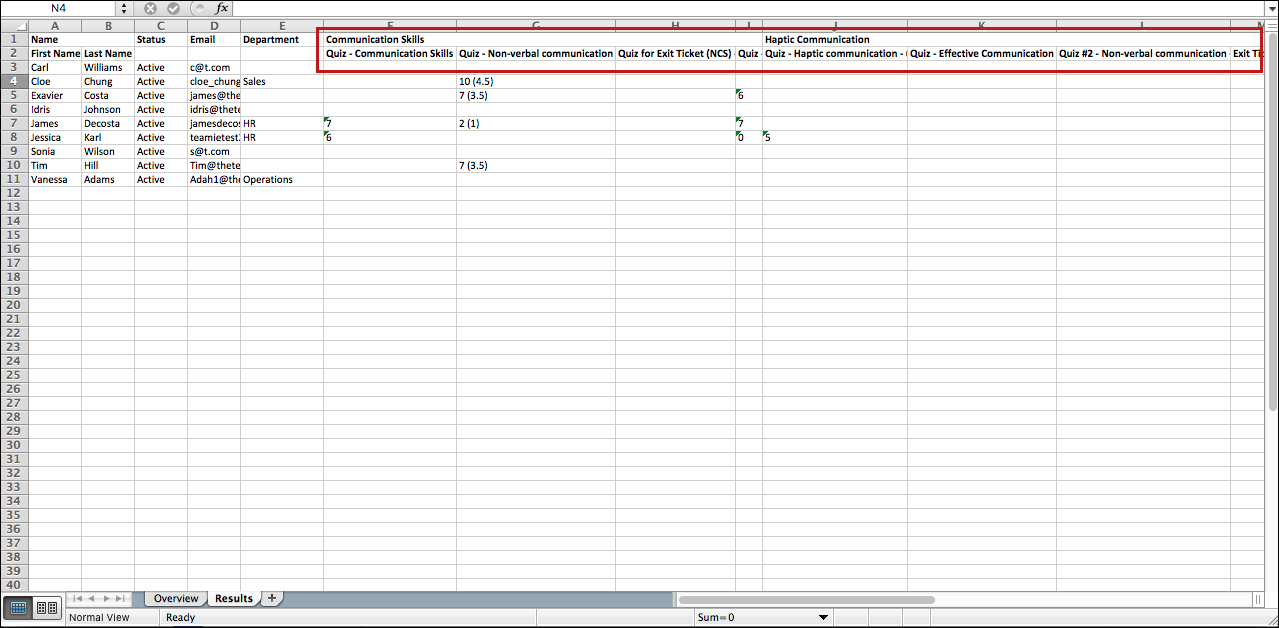
Instructors can export filtered data from Gradebook
Earlier, instructors could only export all the Gradebook data, by default. We have now added the enhancement that will allow instructors to export filtered data into an excel format from a classroom’s Gradebook.
Note: Highlight and HeatMap will not be included in the exported excel sheet.
Configuration to hide learner Gradebook performance chart
By default, the performance chart appears at the top of learners Gradebook. We got feedback to make this performance chart optional, and we have done the same. If required, the performance chart can be hidden from the learner Gradebook.
This will have to be configured from our end, and you can contact your account manager or write to us at support@theteamie.com to hide the performance chart at the site level.

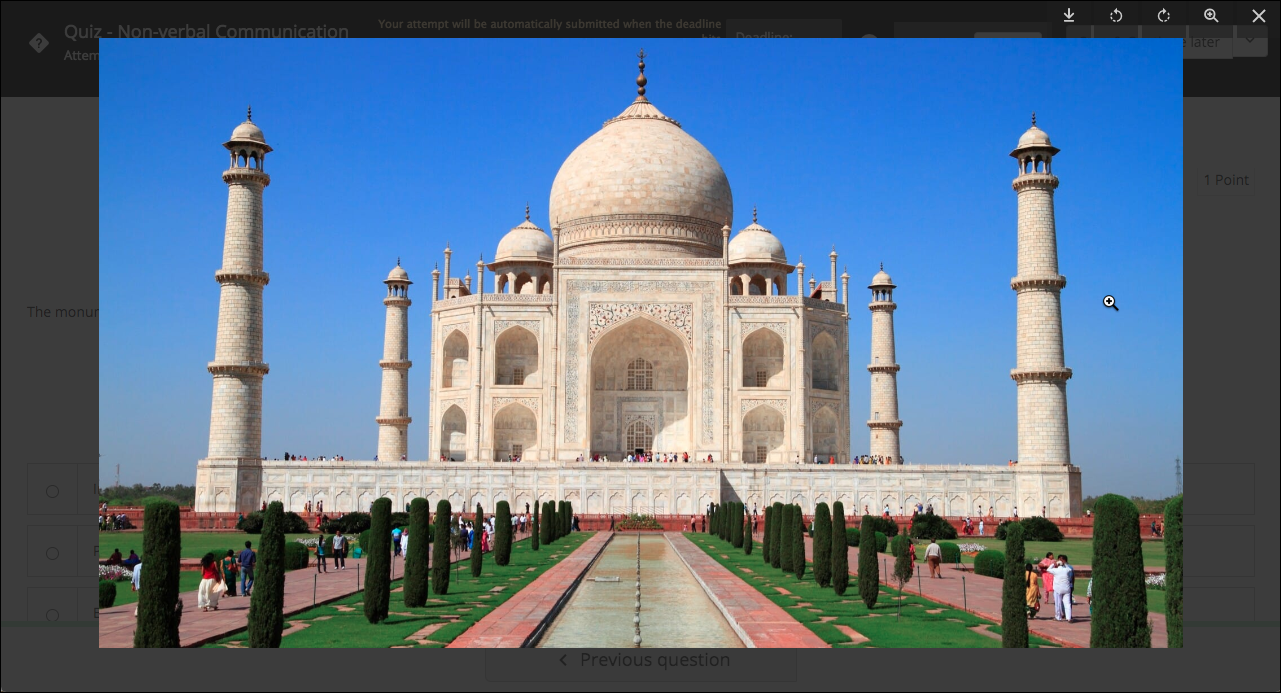
Quiz interface enhancements
Sometimes, large resolution images added to the quiz questions by the instructors or by the learners during quiz submission fills up the space. We have enhanced this in a way that every image will be restricted to 40% of the screen’s height. Therefore, a user can always see content above and below the image at any point. The width of the image is adjusted automatically to this height, and the image itself will always be left aligned.

Clicking on the image will open the image in full size, and users can zoom in any part, if required.

In case all the options for a quiz question don’t fit on the screen, a flashing indicator (down – arrow) will highlight this to the end user to scroll down the page. Intuitive, isn’t it!

Improved download for large files
We were given the feedback that our users sometimes face issues while downloading large files from Teamie. An example being the downloading of learner attempts for an assignment. We have improved our approach for such workflows to make it more reliable.
We will now send the report to the user in an email. On clicking download, a prompt will be shown stating that ‘We are processing the zip file. You will receive an email with the link to download it in a few minutes’.
After this, an email will be sent to the user with the link to download the zip, which will be available for the next 7 days. When your download is ready, you will be informed regarding the file size of the download as well.
We hope all the aforementioned updates will help and encourage you to teach and learn in a more efficient manner.
So, that’s it for this update. See you soon! Till then stay safe and stay collaborative 🙂