
Greetings everyone! Festive season is just around the corner and to begin these festivities, we bring you a fresh new Teamie update, Altair (2.0). Yes! A new version number to keep our best foot forward while moving towards the new year. The main reason behind moving up the ladder to version 2.0 is the introduction of ‘Training Calendar’, by which we intend to assist our clients to handle their online and offline training programs on Teamie. Furthermore, there is a lot in store for you, so let’s first brief you about the features and new workflows rolling out with this update:
- Revamped message interface, and allowing for parent – instructor messaging
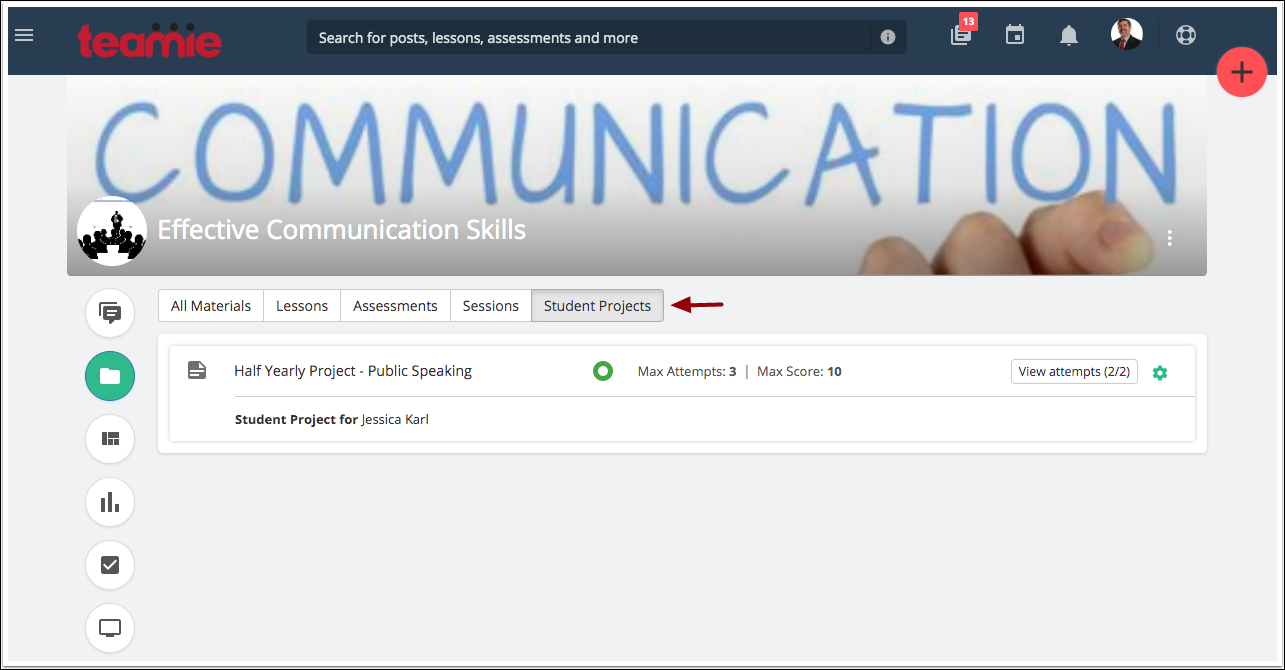
- Student projects to enable learners to define and design their assessments
- A brand new Training calendar to integrate offline trainings on Teamie
- A new toggle for instructors to set Gradebook and assessment visibility for parents
- Percentages toggle in gradebook
- Preview assessments in the assessment bank before copying them
- Option to configure the landing tab inside a classroom’s Gradebook
Let’s dive into the details now.
Messaging
Messages allow users to communicate with each other privately on Teamie. We have revamped the user interface to make it more intuitive and easy to use. As a user, you will be able to send messages to other users who are in the classrooms that you are part of. Such users are also known as your connections and appear in the People tab of the classroom.
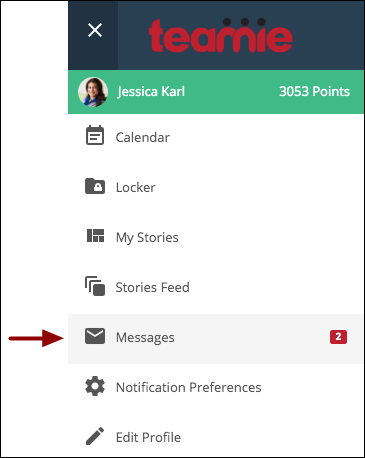
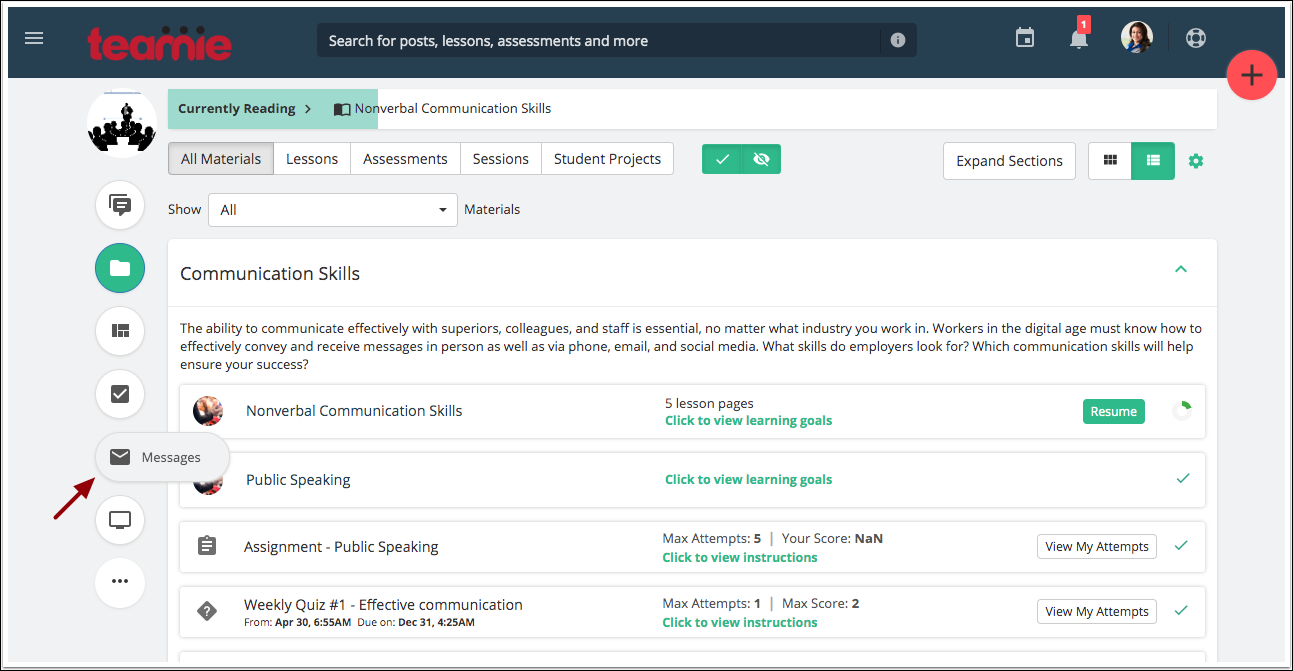
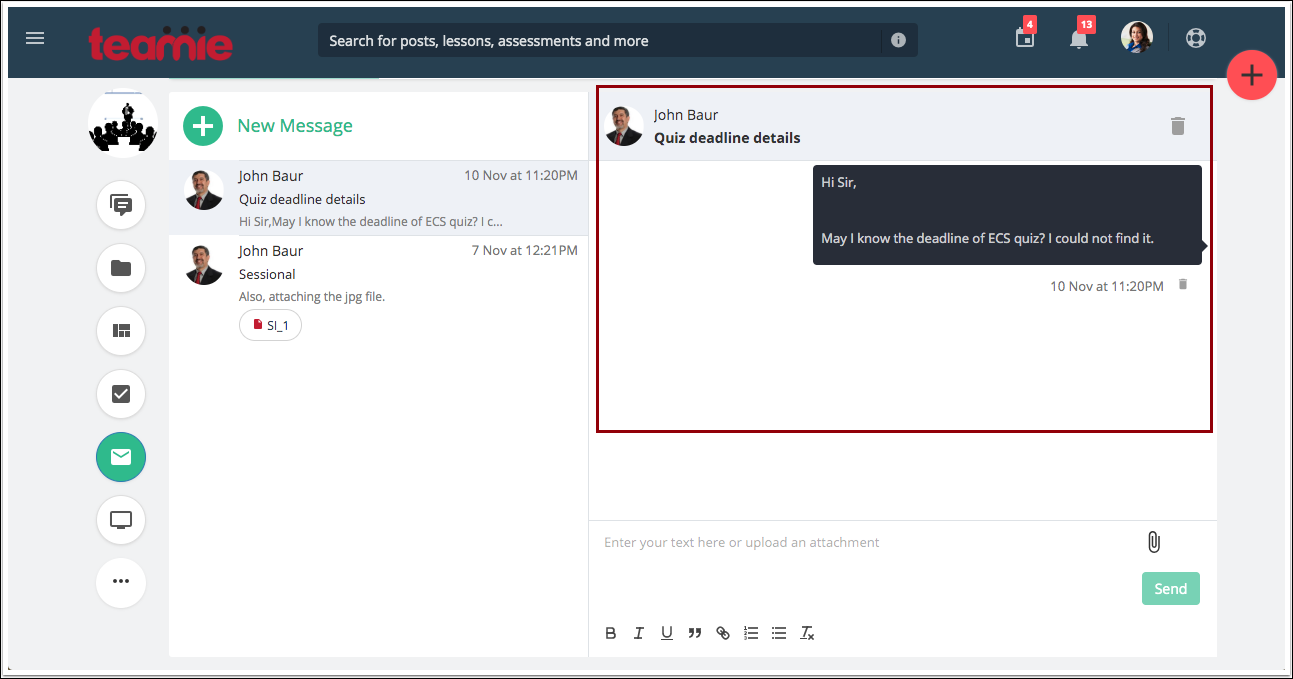
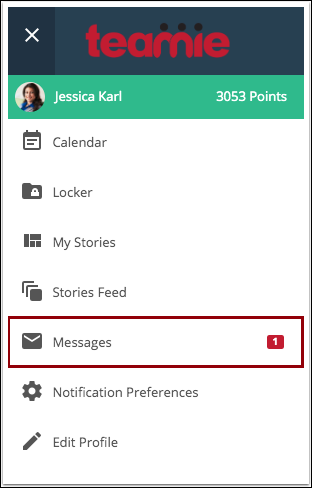
You can access all your messages from the Message menu in the sidebar.
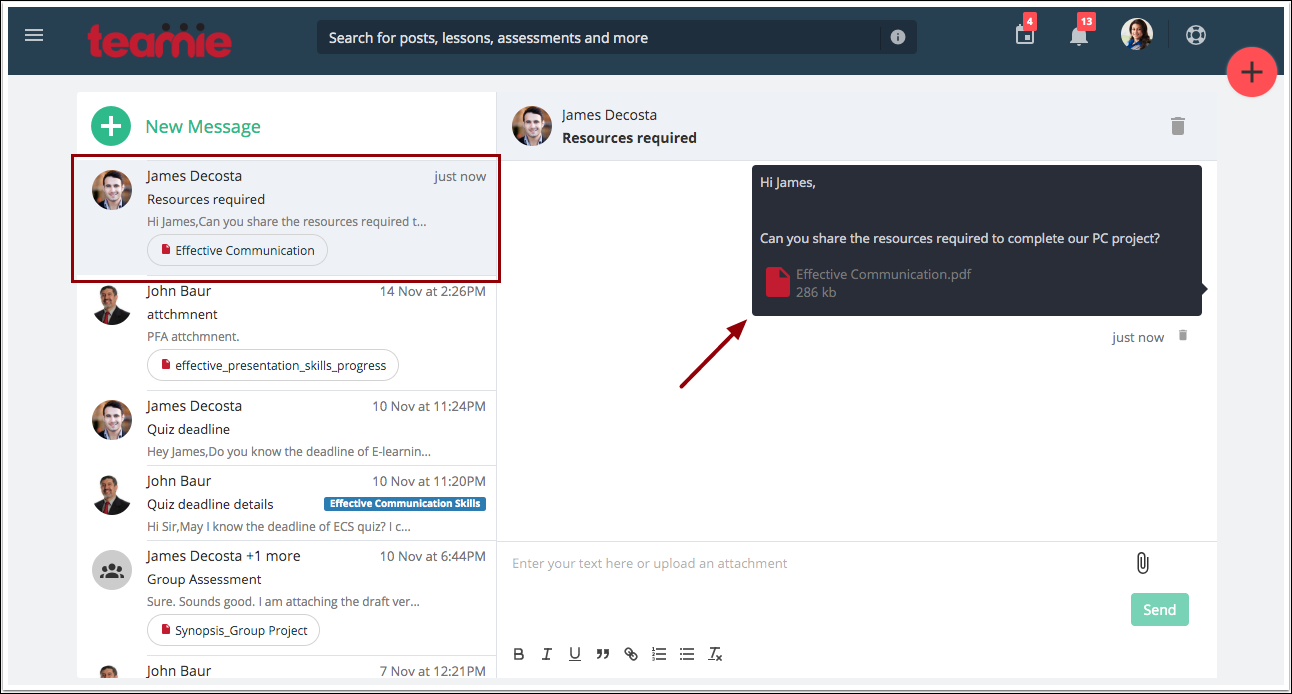
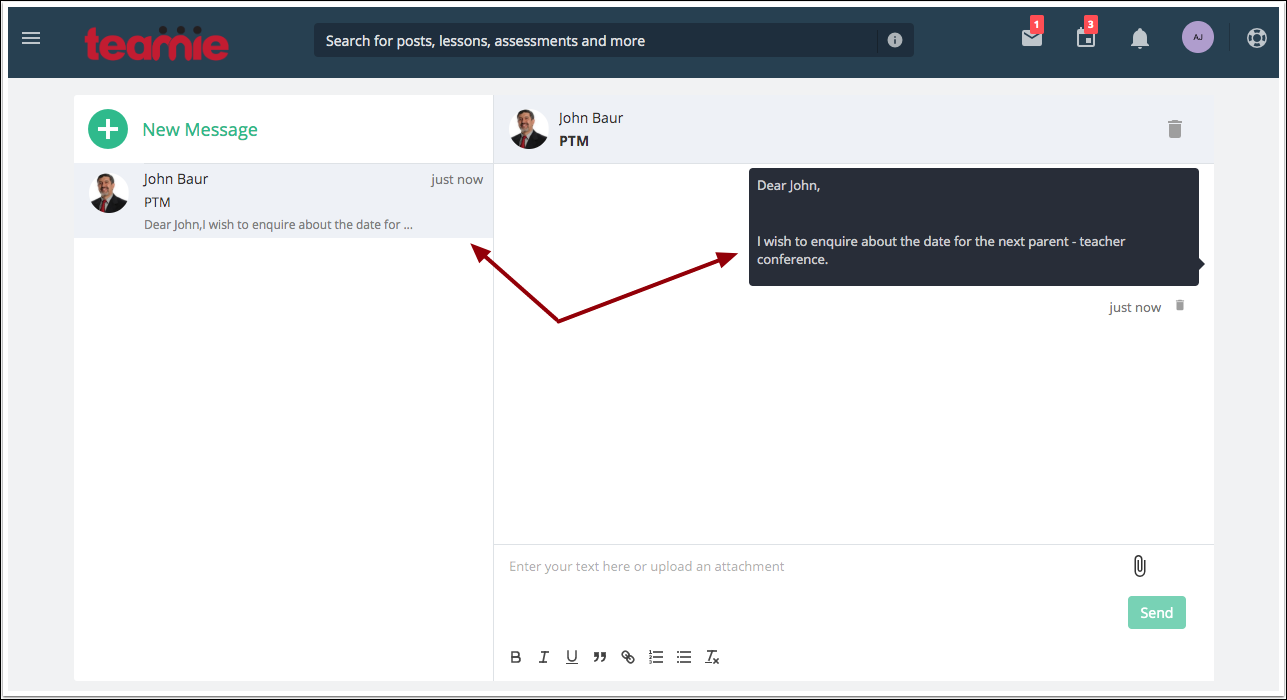
All your conversations are housed here in the left pane. By default, the latest conversation is expanded. A conversation can have one or more messages from you and the recipient. You can click on any conversation in the left pane to read its messages in expanded view on the right.
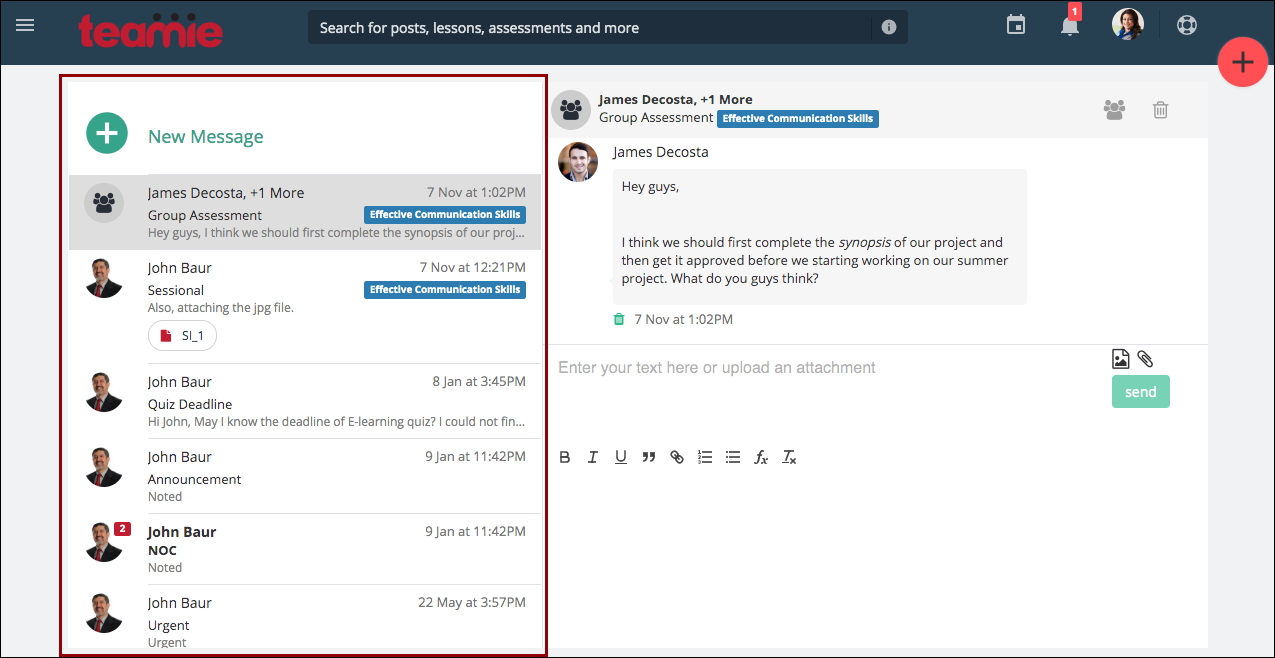
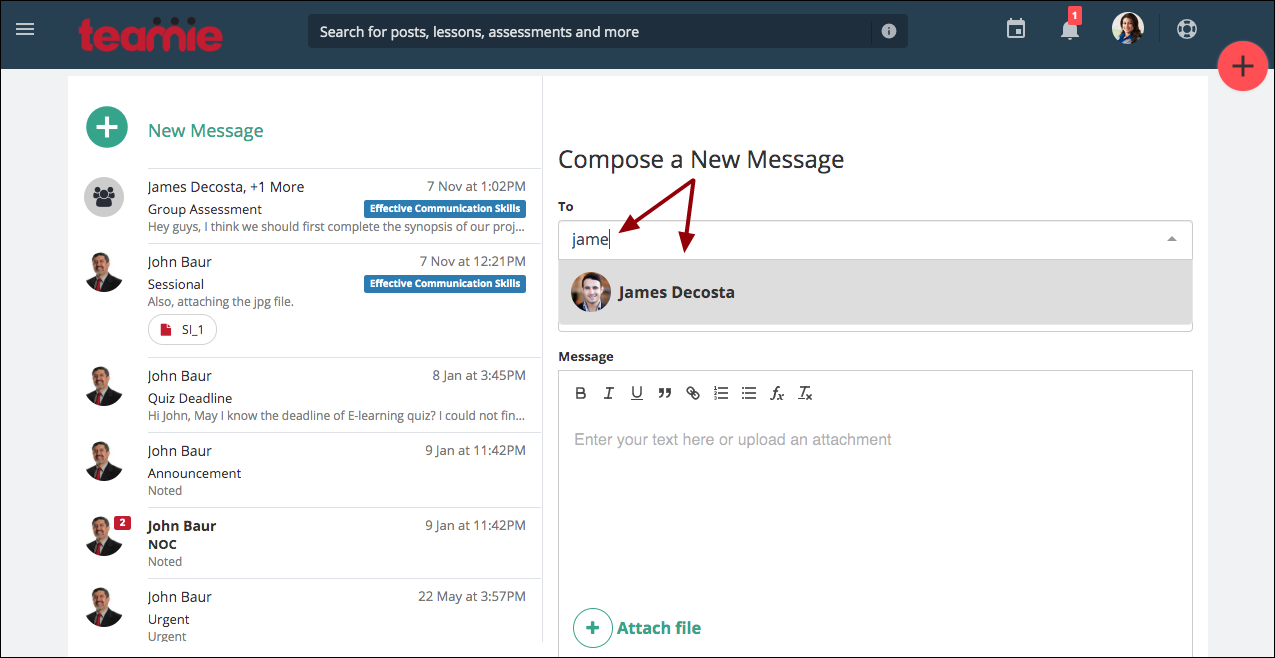
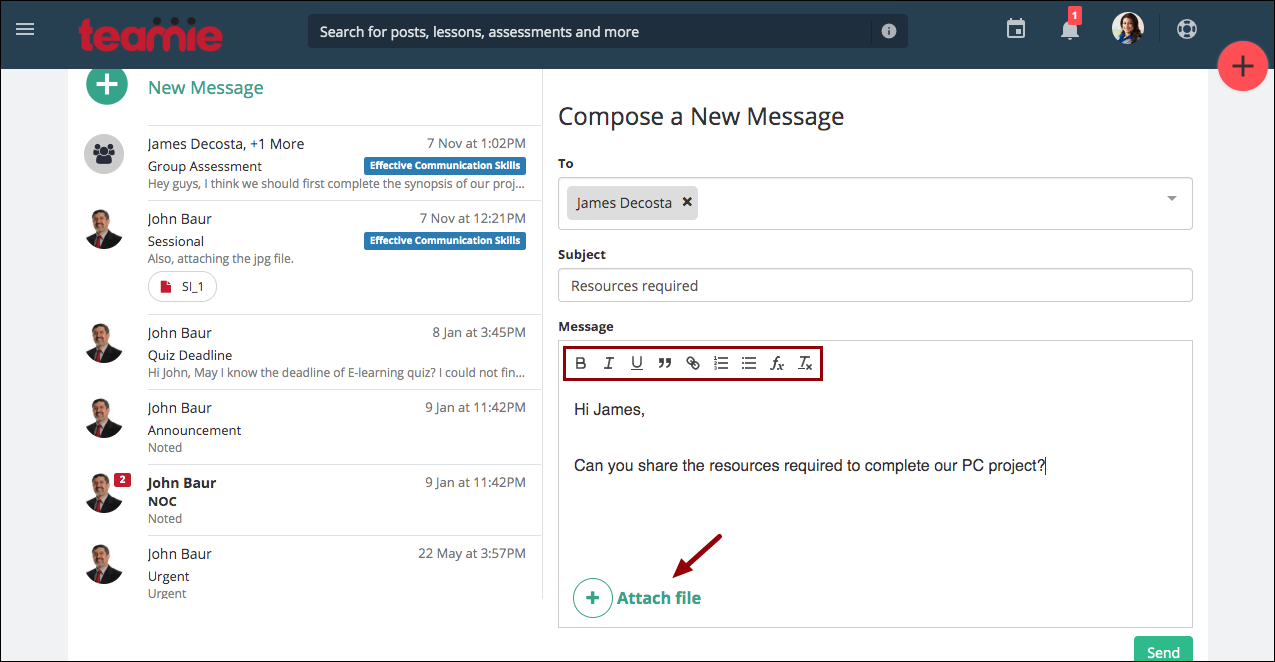
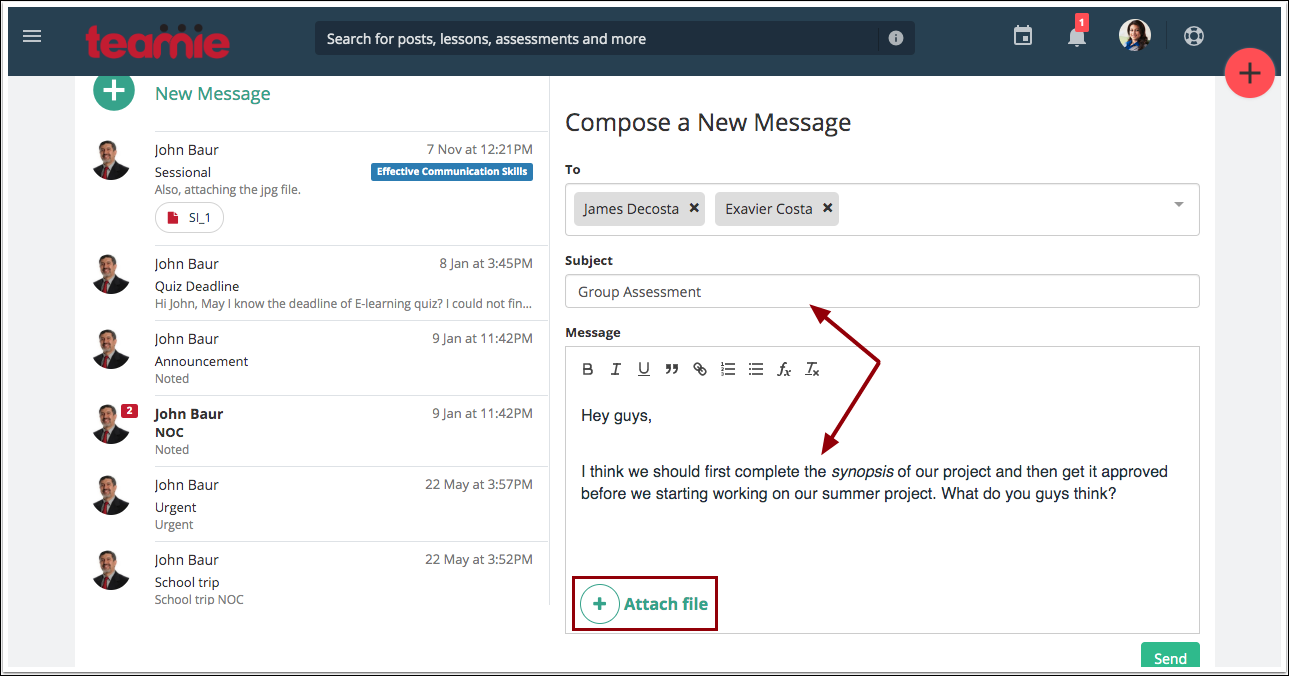
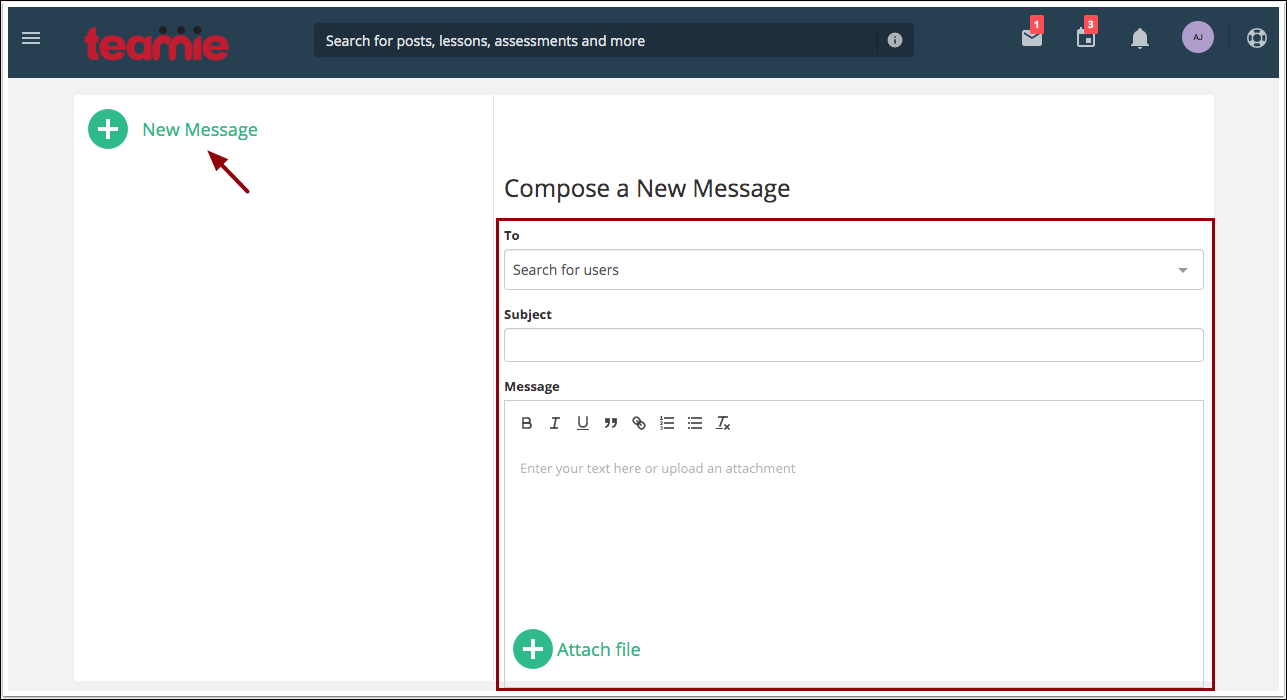
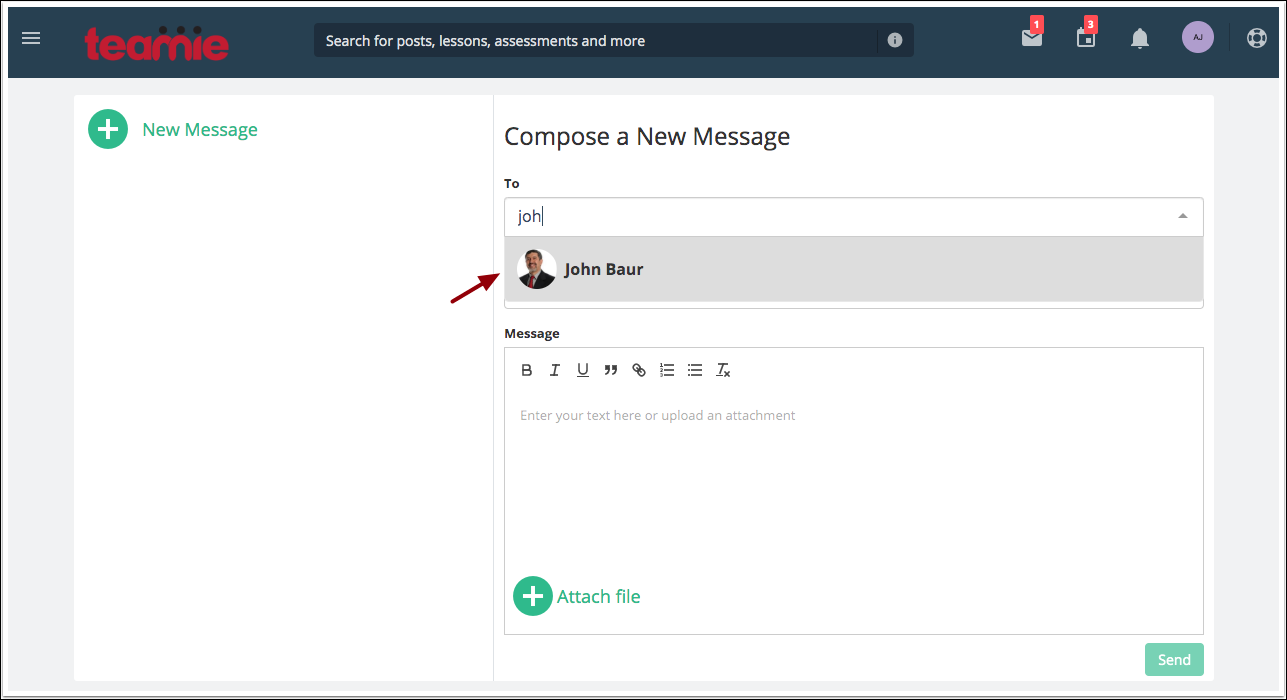
You can send a message to your connections by clicking the + New Message button. In the To field, start typing the name of the connection to whom you want to send the message and names of your connections that match the entered string will appear in the drop-down. Select the relevant connection from the drop-down.
All the commonly used rich text options are available for you to format your message. In addition, you can also add an attachment to your message.
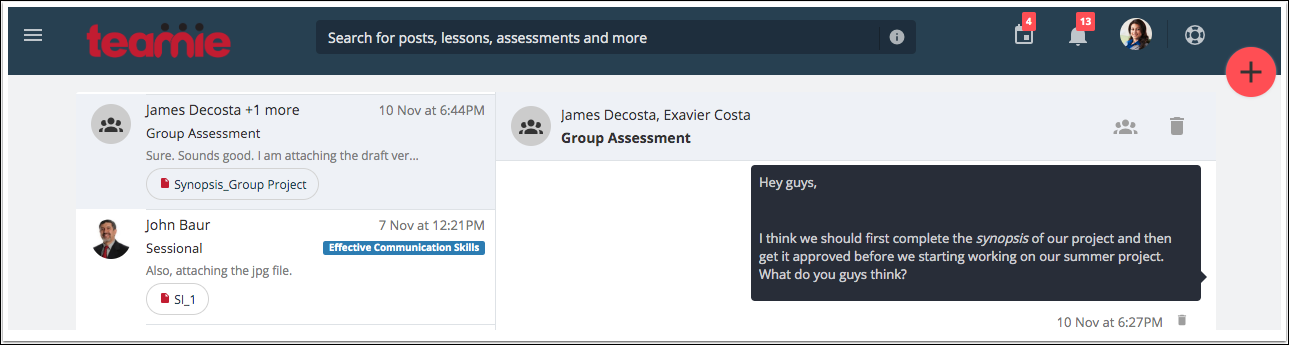
Once you send the message, you will be able to see it in a conversation view, differentiating your messages to appear on the right in black and the other participants’ messages appearing on the left.
Similarly, you can send a group message by adding multiple recipients in the To field.
You can create messages from within a classroom. They are linked to a classroom to allow easier categorization. Also, you can easily see, in the main messages page, which classroom it is linked to.
You can do this from the Messages tab of a classroom.
On the main messages page, you can see the messages that are created from a classroom with that classroom’s label.
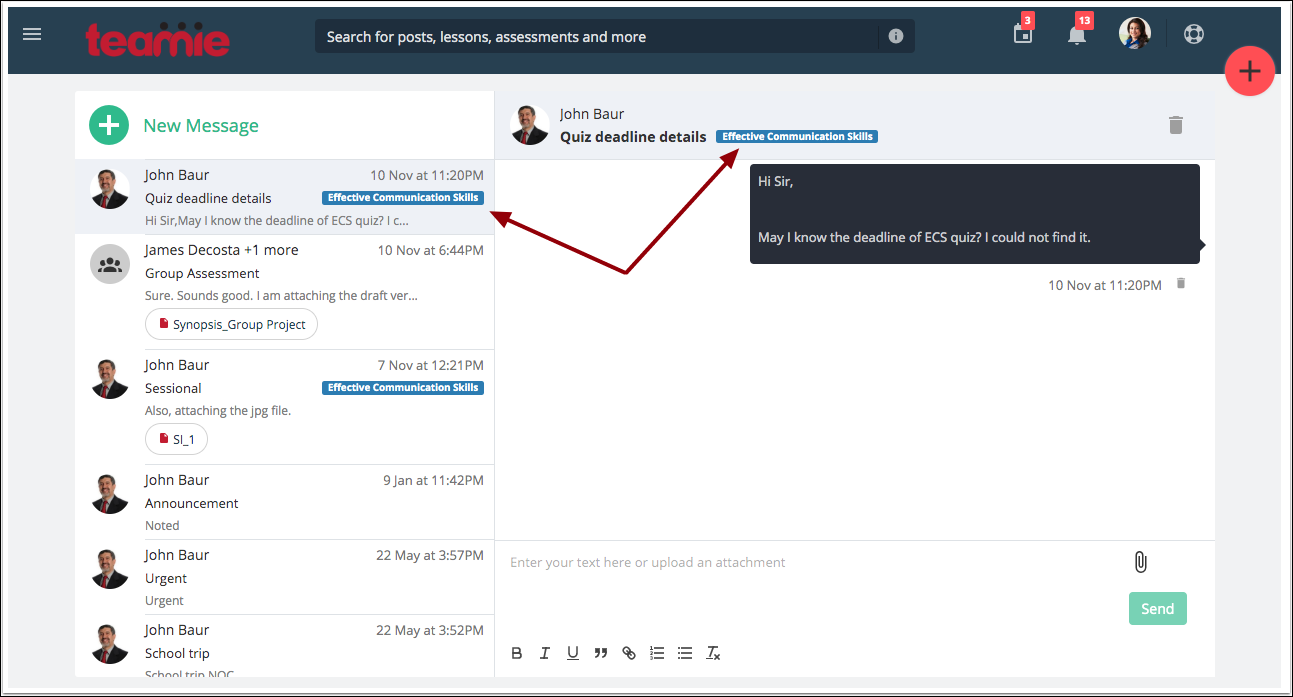
P.S: The classroom messaging is a new feature and you need to write to us In order to enable it on your site.
Parent – Instructor Messaging
Parents can now also initiate conversations with instructors of classrooms their children are part of, even when they themselves are not part of any classroom. Vice versa, instructors will be able to message their student’s parents. This is an optional feature and you need to write to us to enable it on your Teamie site.
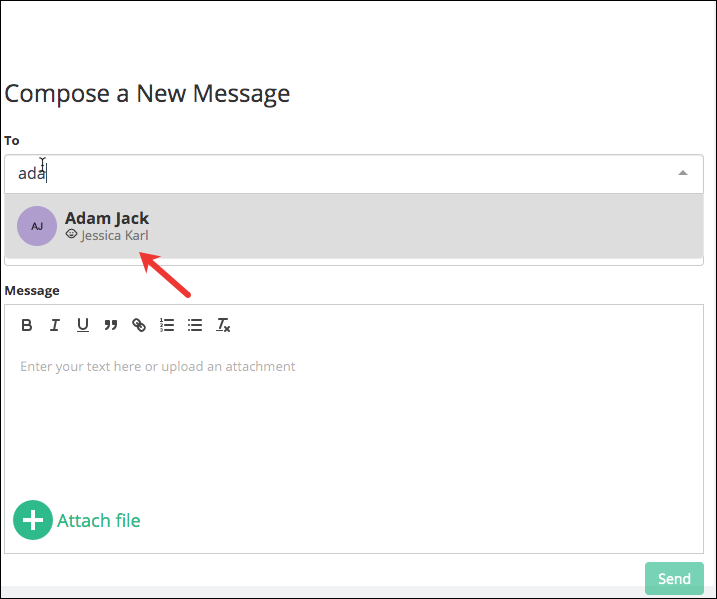
As a parent, you can search and select the instructor’s name of your child. Similarly, an instructor can search for the parent of a learner in their classroom.
Note: Parents will only be able to message instructors of their children, not others. Similarly, instructors can only message parents of the students they are teaching.
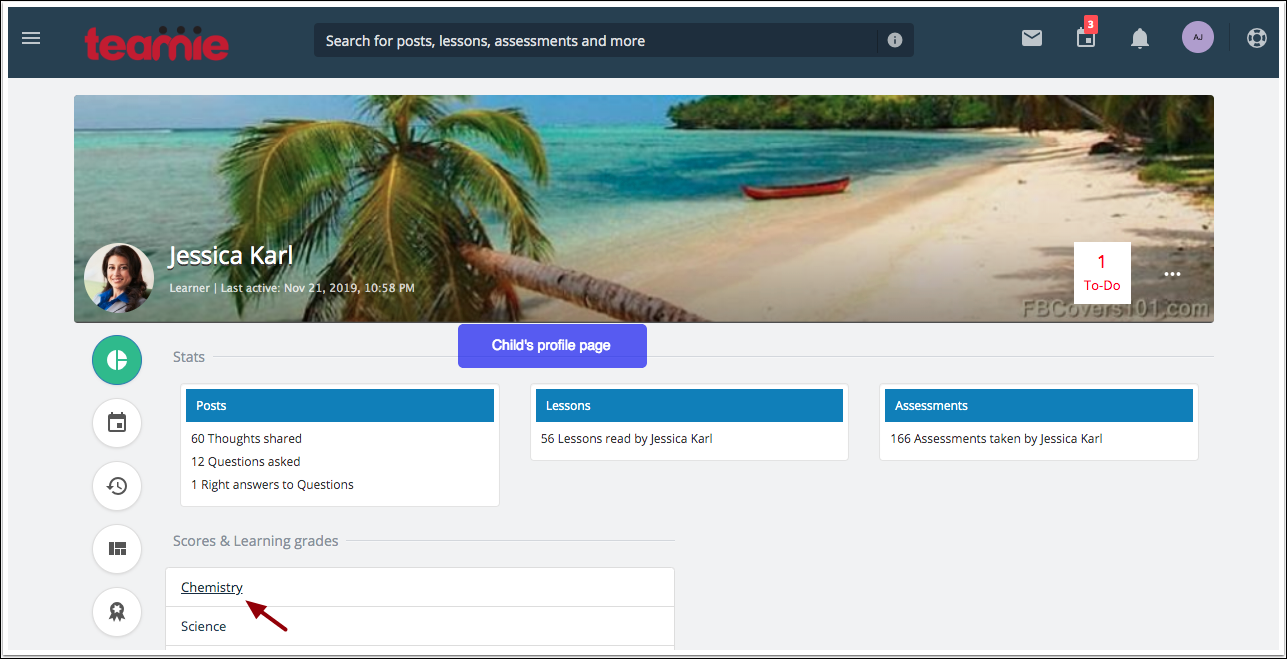
As a parent, you can access a classroom’s About page of your child’s classroom from their profile page. Thereafter, from the About page of the classroom, you can then send a message to any of the instructor in that classroom.

Also, when an instructor writes to a parent, they will be able to see their child’s name as well, allowing the instructor to write to the parent without needing to refer to their details separately.
Student Projects
Student Projects is a student-led assessment activity. The student defines what the project or assessment is, sets their own due date, and builds a rubric to define how they will assess the project. While creating the rubric, apart from adding their own criteria students can also pick from the learning objectives/standards from the curriculum, and use the Student Project to demonstrate their mastery on those learning objectives/standards.
Then, the instructor(s) in that classroom can view and edit the Student Project, if required, before publishing it for the learner to attempt. Once the learner submits the attempt, instructors will then be able to grade it as they would any other assignment.
This is an optional feature and, if interested, you can write to us to enable it on your site. Personalised learning feature should also be enabled on your site before you enable ‘Student Projects’ in a classroom.
We have a neatly written blog post from our leadership explaining how student projects can empower students to design their learning.
Training Calendar
Our team has been working on a new feature to increase Teamie’s blended learning scope and value proposition by allowing clients to use it as a training management system (TMS), in addition to an LMS. Training calendar is a first step in that direction to allow learners and administrators to view and filter classroom trainings that are created on Teamie. Leveraging this, our clients can bring their offline workshops and classroom based training programs on Teamie and hence, be able to manage and deliver blended learning programs through a single platform – Teamie!
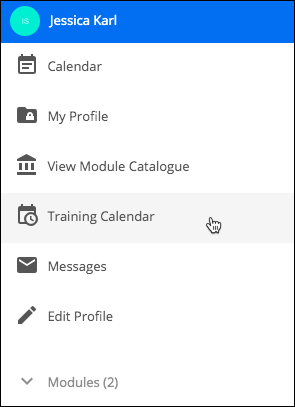
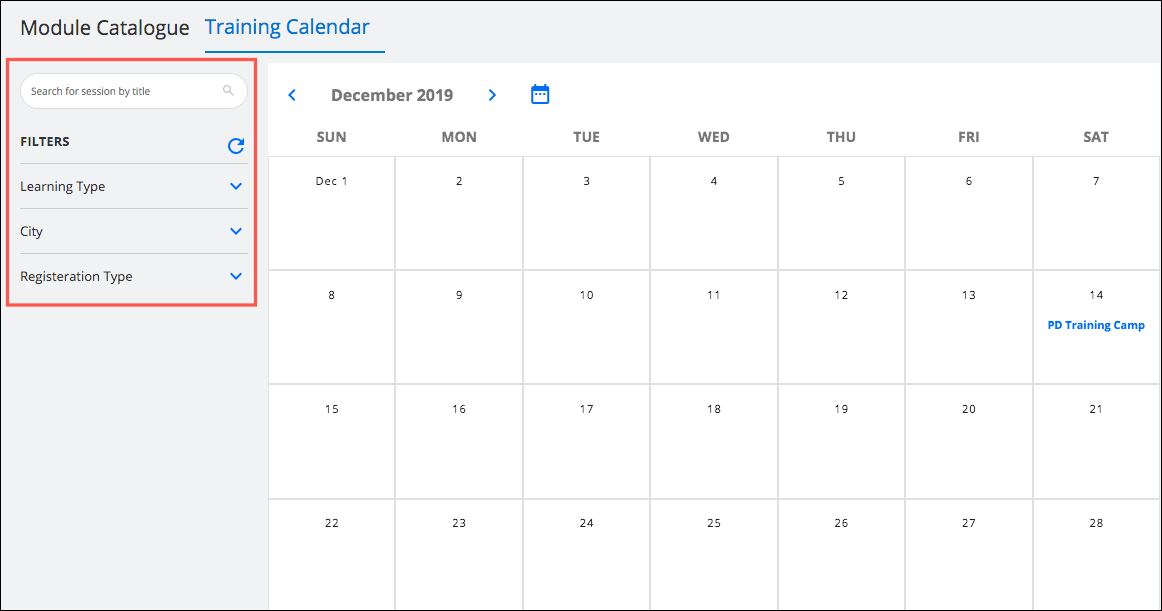
The Training Calendar button will be available in the sidebar to access the training calendar.
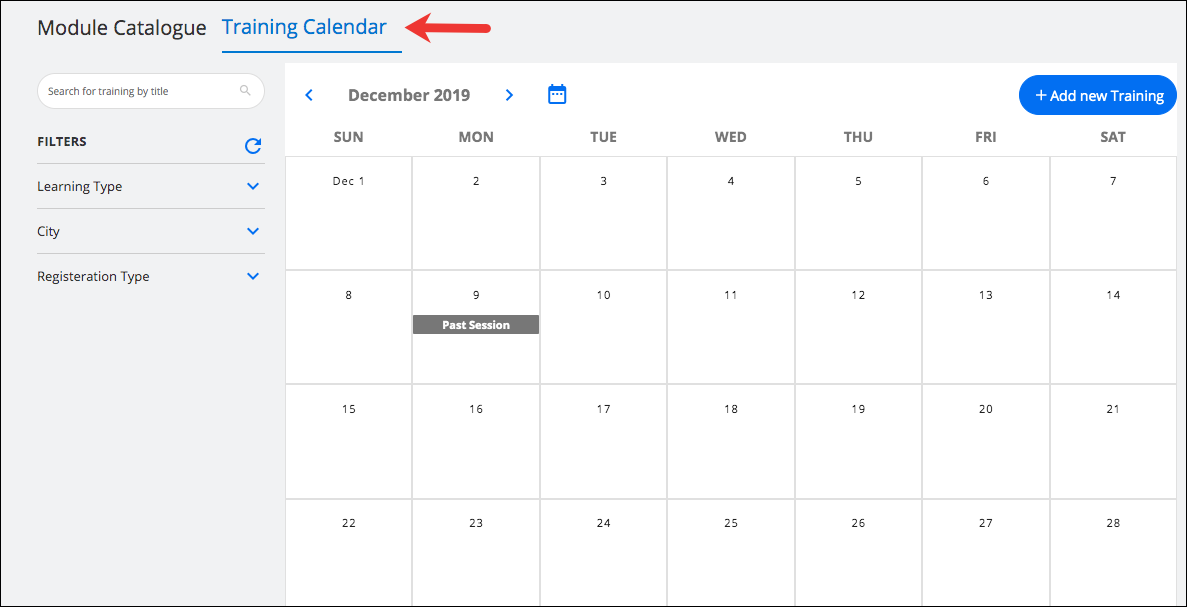
As shown above, the Training calendar is intuitively housed with the Module Catalogue, essentially grouping module registration and training registration into in a single place.
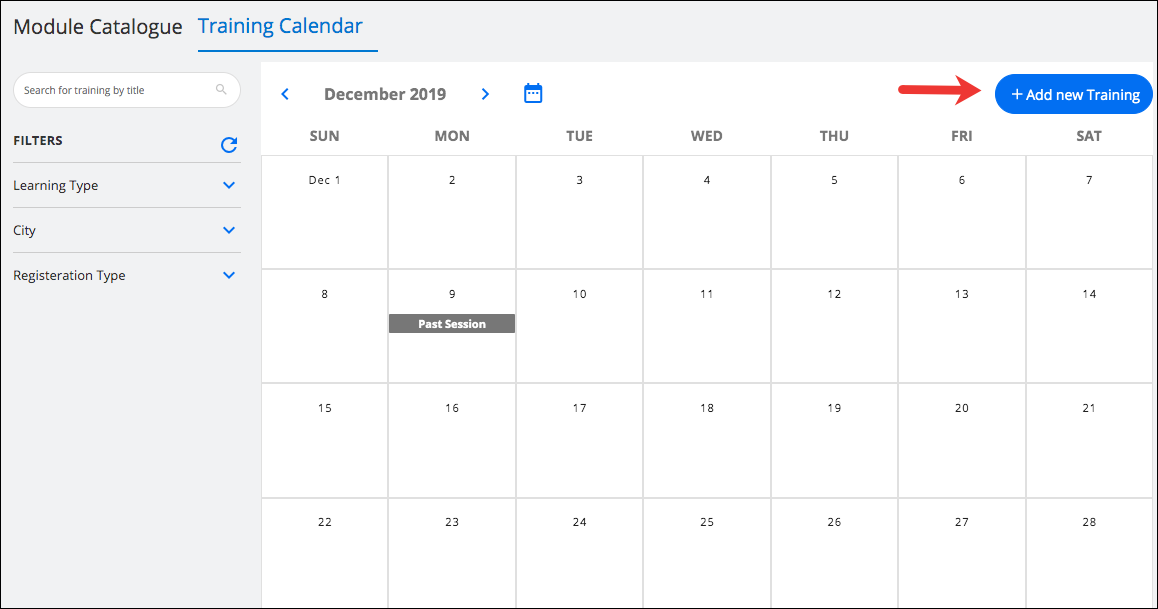
As an administrator, you can add a new classroom training by clicking the + Add new Training button.
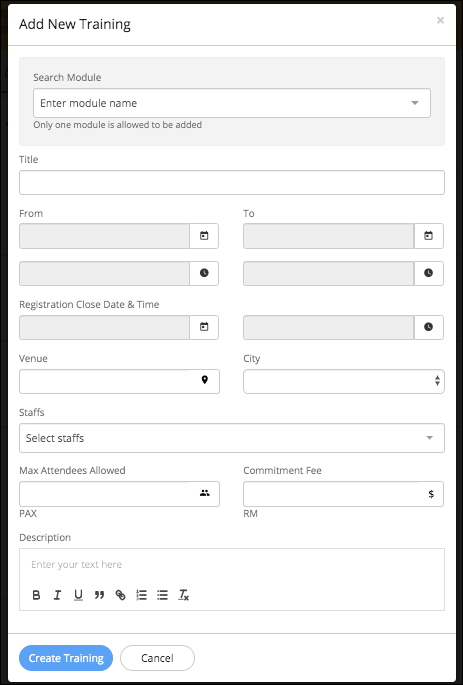
The Add New Training modal opens in which the following information regarding the training needs to be added by the admin:
- Module*
- Title*
- From Date & Time*
- To Date & Time*
- Registration Close Date & Time
- Venue
- Staff
- Max Attendees Allowed
- Description
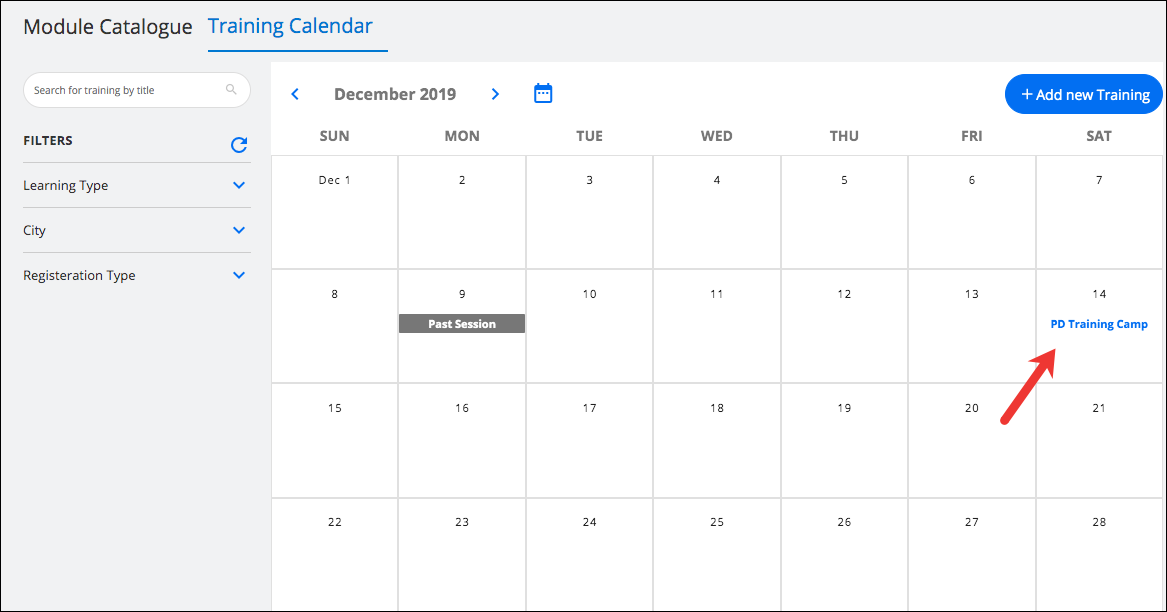
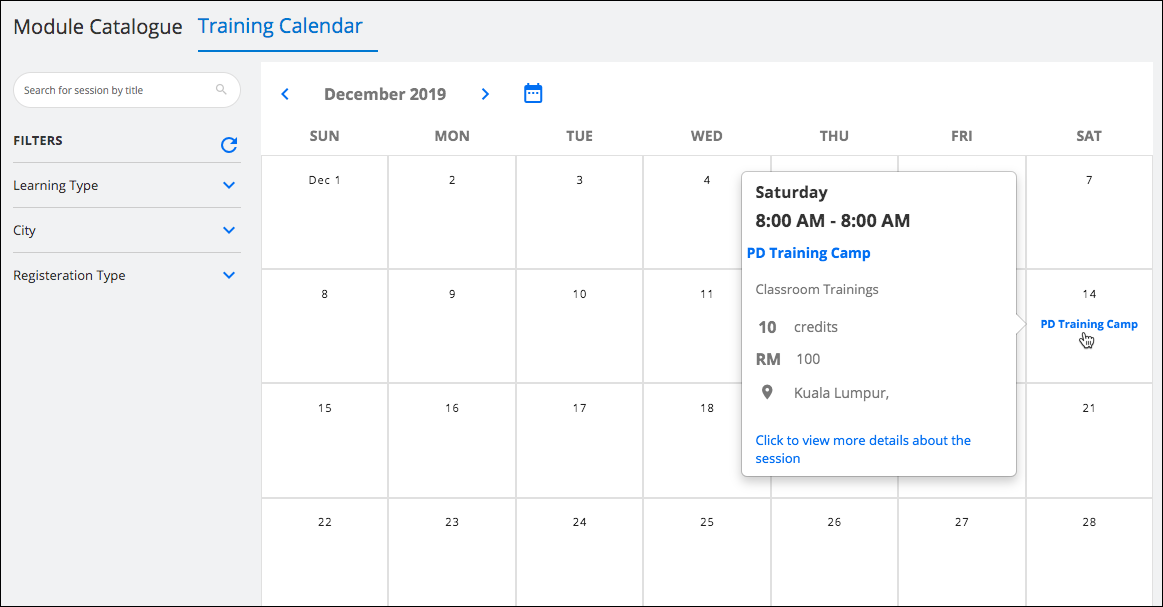
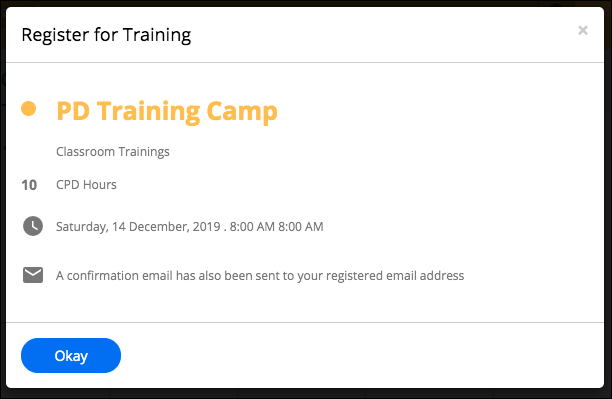
Once the training session is created, you will be able to view its details by hovering on it.
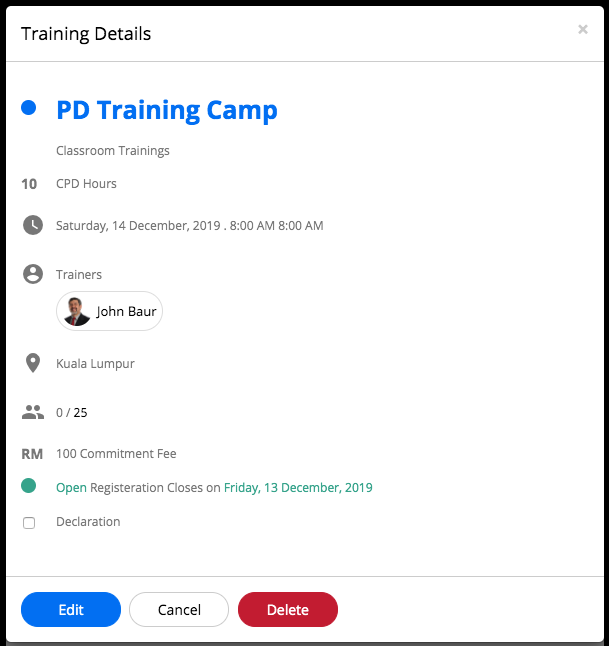
You can also click it to view its expanded view, which allows you to edit or delete the training session.
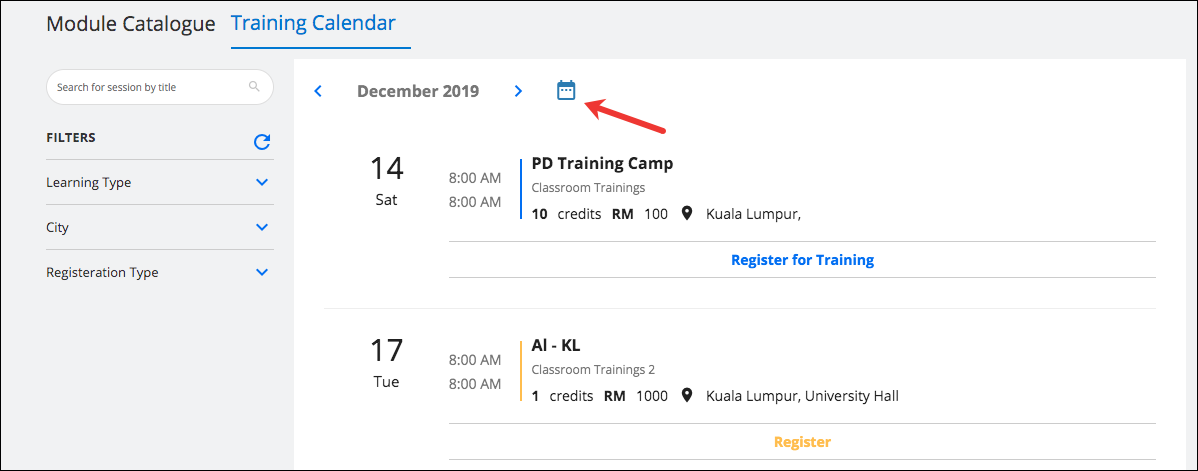
Learners will be able to view the details of the training session by hovering on their Training Calendar view. The training sessions are colored differently based on their status – Open for registration, Registration is closed, User has registered, and User has registered for another session in the same classroom. This way, learners can quickly gather which training session they need to enrol in.
Note: The color codes of the training sessions will depend on the color theme of your Teamie site.
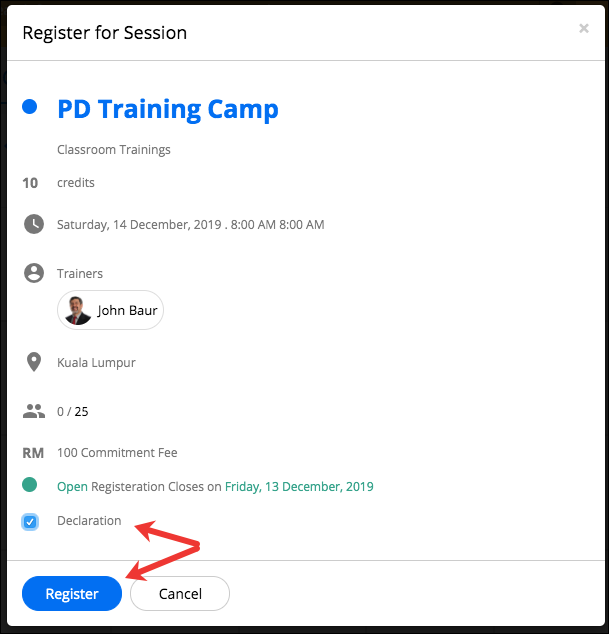
Depending on your requirements, learners can be required to tick a Declaration checkbox before registering for the training session by clicking the Register button.
Note: The Declaration can include any custom terms and conditions that the learner should know before accepting the declaration, as per the client’s needs.
All the training sessions created on the site will be available to all learners. They can quickly filter the relevant trainings by using a different set of filters available on the Training Calendar page.
Learners can also view the training in list view by clicking the calendar icon. This view may provide a more relevant representation of the available training sessions along with their color-coded statuses for registration purposes.
Kindly contact us in case you wish to enable this feature and manage your offline sessions for workshops, trainings, etc on your Teamie site.
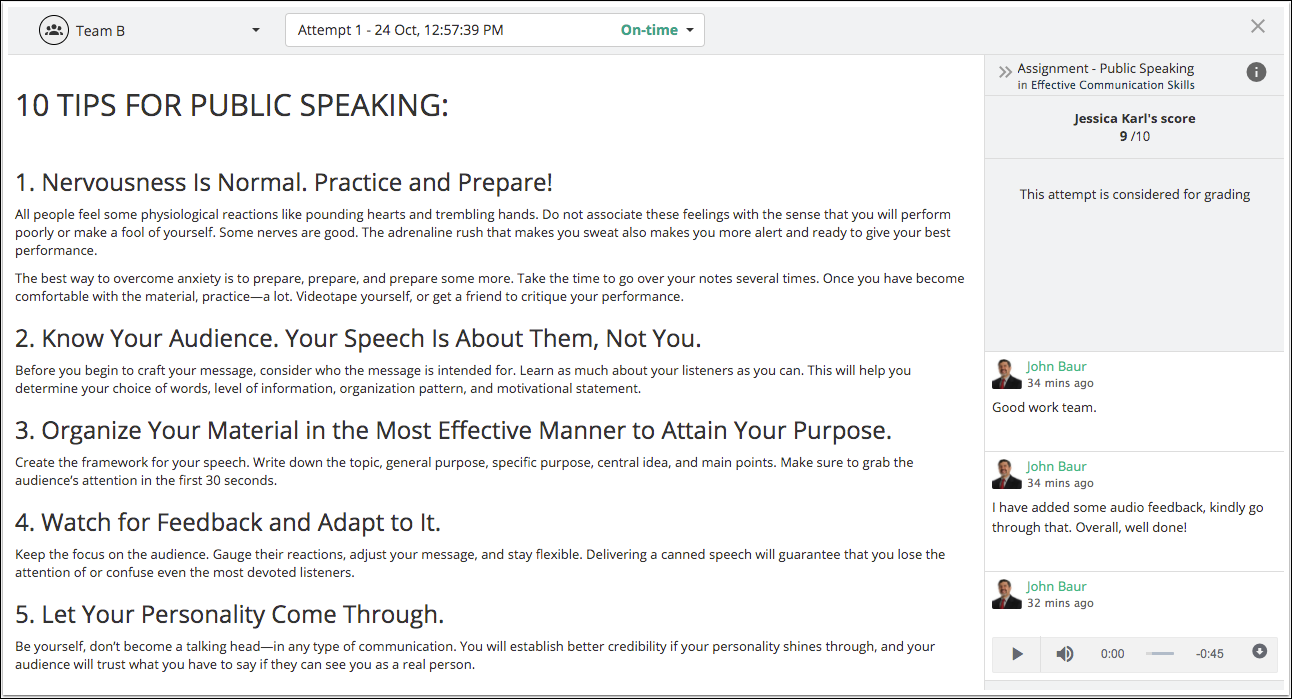
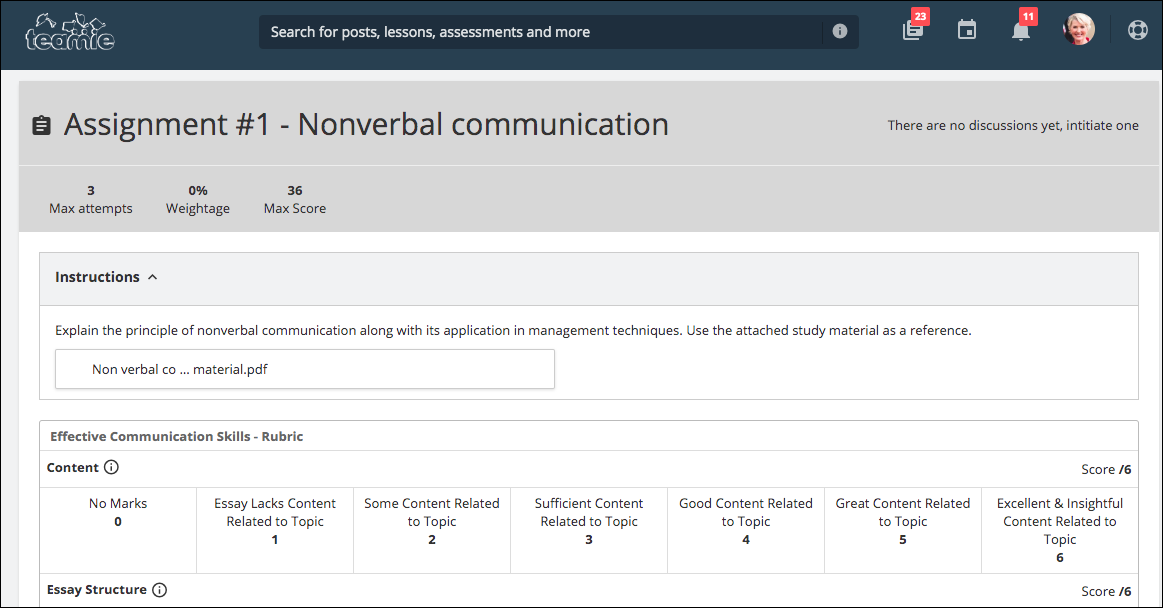
Toggle to set Gradebook and Assessment Visibility for Parents
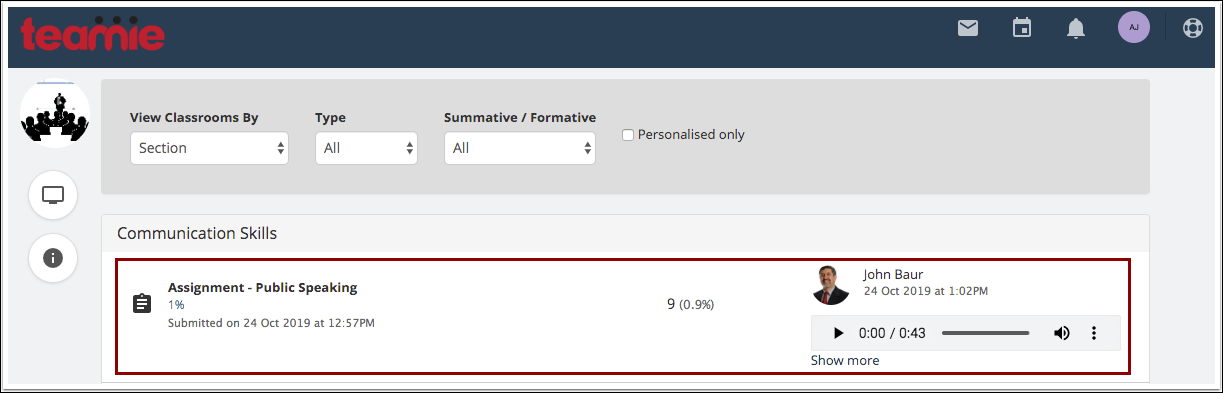
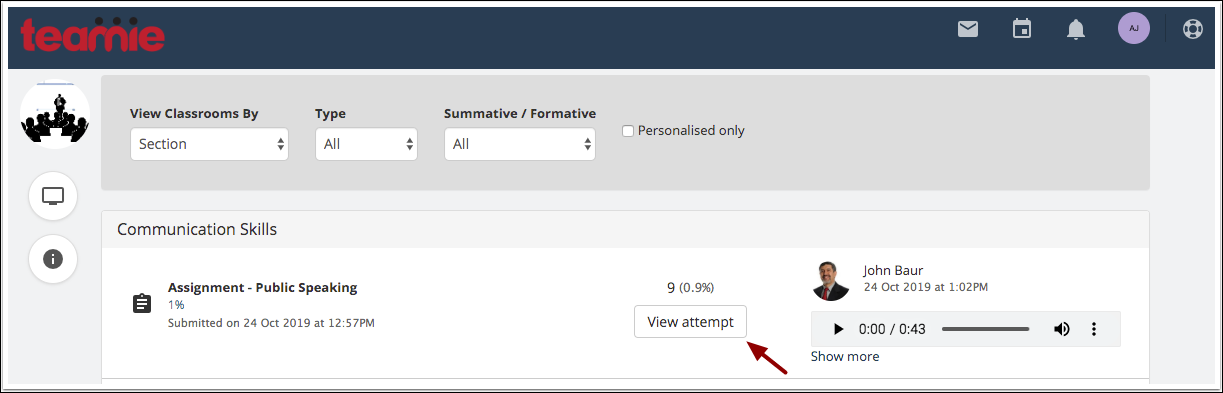
Earlier, if parents are given access to their children’s gradebooks, they get access to all the assignments for all classrooms of their child. We are now allowing the configuration to be more granular. As an instructor, you can now restrict this access by choosing to show or not show an assignment to parents in their child’s gradebook.
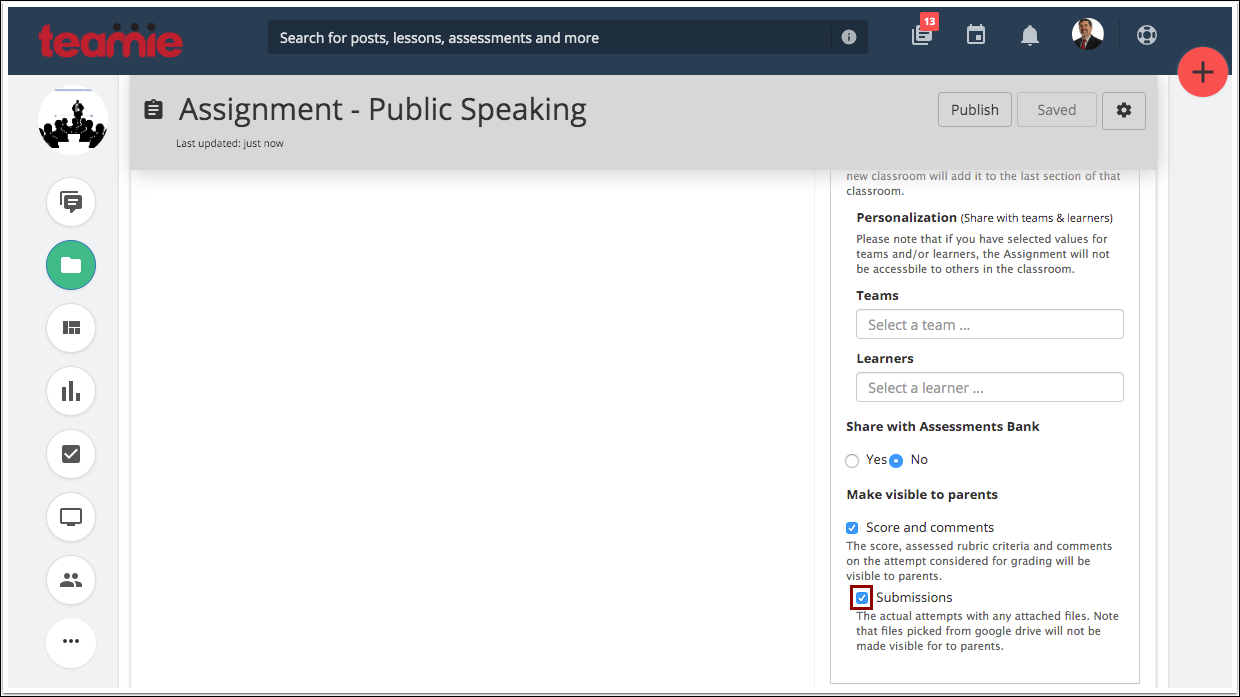
Under the Make visible to parents setting, tick to enable Score and comments. Once you tick this checkbox, the score, any assessed rubric criteria, and comments on the current attempt (i.e. considered for grading) will be made visible to the parent(s) when they access their child’s gradebook.
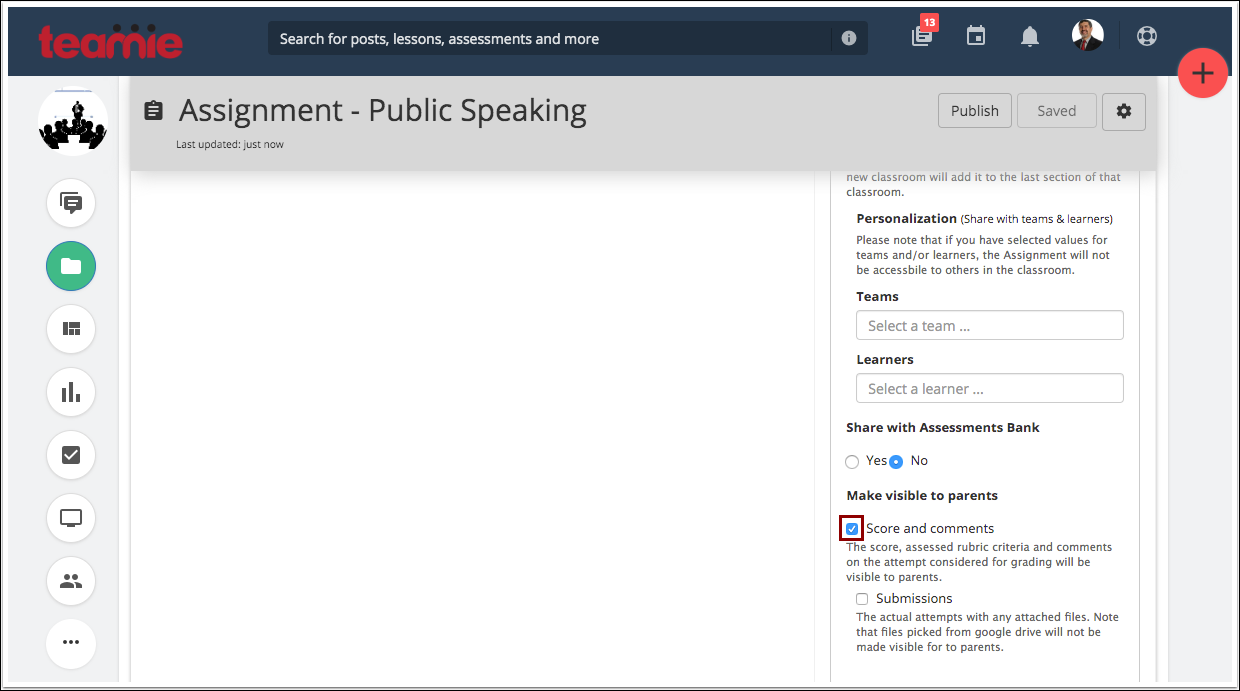
Once you have enabled the Score and comments setting, you will be able to see a subsetting – Submissions. Checking this will allow parents to view the actual attempt made by the child along with any attached files.
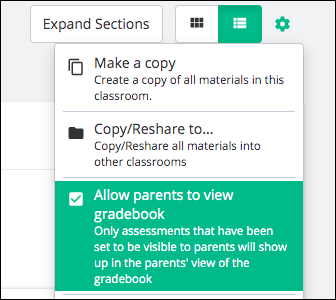
Additionally, there is another setting at the classroom level to allow parents to view its gradebook. By default, it is disabled. As an instructor, you can enable it from the classroom settings.
Note: In case you wish to allow teachers to view these ‘Make visible to parents’ settings, you need to write to us. Also, kindly let us know whether you also need this setting to be enabled automatically for all the existing assignments. If not enabled, then all the existing assessments will not be visible to the parents in their child’s gradebook.
Minor Enhancements
Now, let’s have a look at some minor enhancements that were rolled out after the last major update.
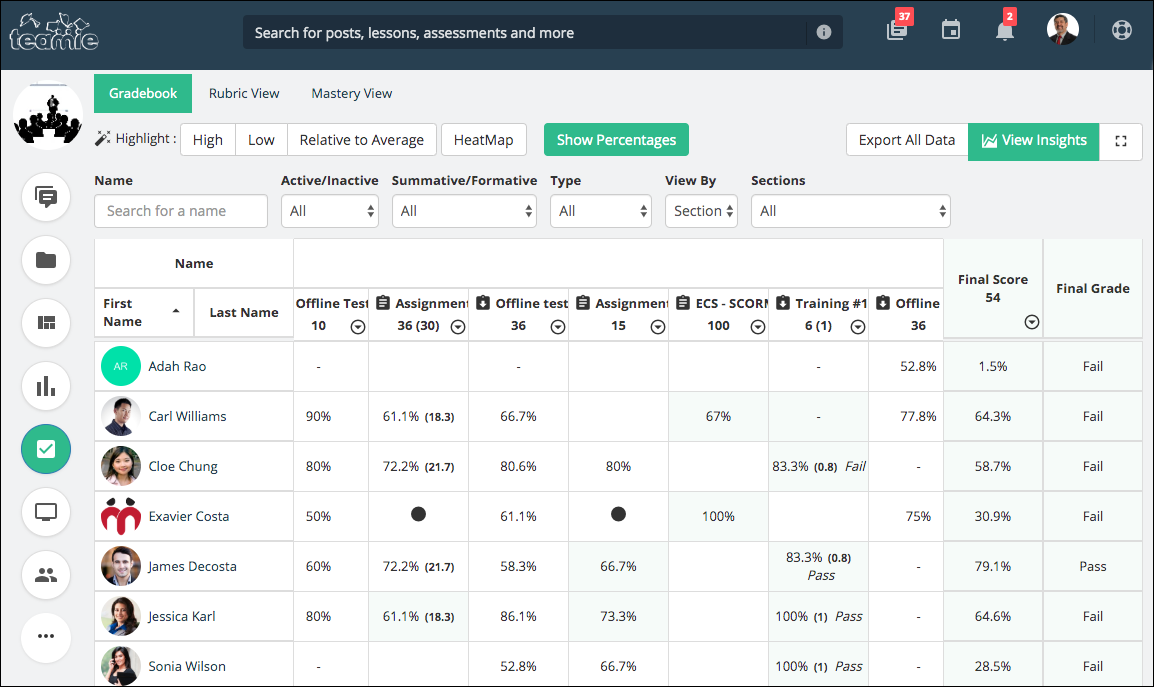
Percentages Toggle in Gradebook
We now have a new toggle, Show percentages, using which you can convert all scores in the gradebook cells to percentages.

Preview Assessments in the Assessment Bank
You can now preview an assessment in the Assessment Bank before making a copy of it. Unlike earlier, now you don’t have to be a part of the classroom, in which the assessment is shared, to know what is in the assessment before making a copy of it.
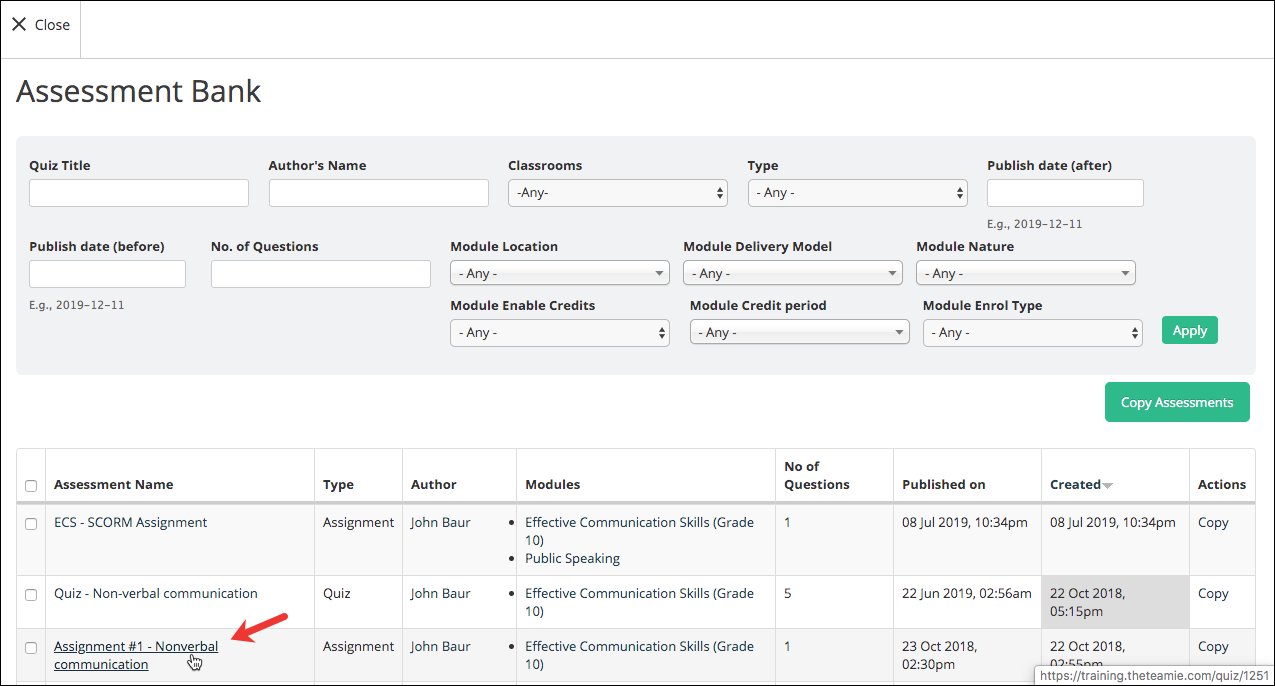
For quiz questions, you will see its preview. For an assignment, you will see a read-only view of the assignment instructions, and the rubric details, if attached.
Option to Configure the Landing Tab Inside a Classroom’s Gradebook
In our last update, we introduced a configuration for setting default tab for classrooms. Now, we are introducing an option to configure the landing tab inside a classroom’s gradebook. So, you can choose which among the following tab should open while clicking the gradebook tab of a classroom:
- Gradebook
- Rubric View
- Mastery View
For learners, only the following two views are available:
- Gradebook
- Mastery View
If Rubric View is selected, then teachers will land on that while learners will land on the Gradebook tab.
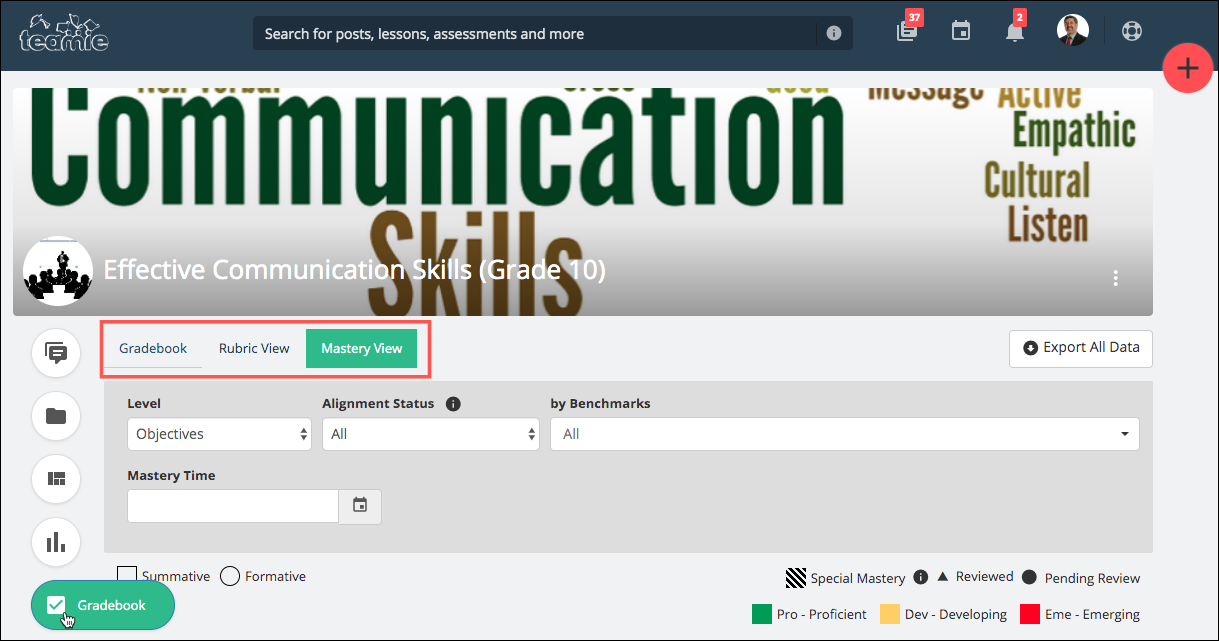
You need to write to us in case you wish to change the the landing tab inside a classroom’s Gradebook.
Well, that’s it for this update and yes, sorry for the lengthy year-end post 😉 See you soon and have a great holiday ahead. Merry Christmas and a Happy New Year to all of you. Stay healthy, stay collaborative!